Wednesday, December 10, 2014

How to Remove Netflix Account from a TV, Roku, Apple TV or Blu-ray Player

If you are getting rid of a Blu-ray player, game system or Smart TV that you've previously set up for Netflix and you want to remove your account from the device, it can be a little tricky. Netflix used to allow you to manage devices online in your Netflix account but they've since disabled that feature.

Currently if you want to remove a device from your account online, you have to deactivate *ALL* of the devices and add them back in one at a time. This can be annoying if you have multiple accounts like a Wii or Wii U, Blu-ray player, Apple TV, PS3 and Smart TV all set up for Netflix streaming.

But there is a way to break the link to your Netflix account from the actual device itself. So far, we've confirmed that this works from multiple devices (TVs, Blu-ray players, etc.) and multiple brands (Panasonic, VIZIO, Samsung, LG).

To deactivate the device, get into the Netflix screen on that device, then using your device's remote control, hit the following buttons:

up, up, down, down, left, right, left, right, up, up, up, up.

This should take you to a Netflix system information screen with the option to Disable or Deactivate the player from your Netflix account.  Click the "Deactivate" button to remove the link to your Netflix account.


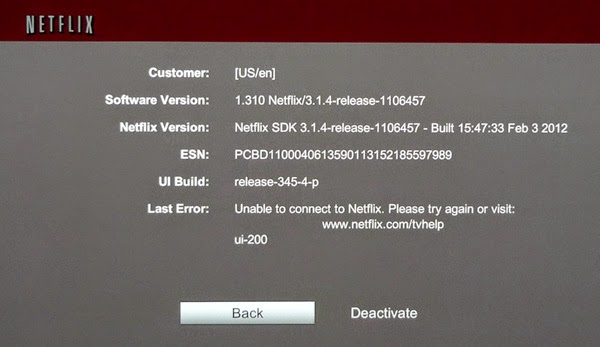
After you hit the proper button sequence, you should see a screen like this.
Go back into Netflix on that device again to confirm that it no longer has access to the account.  You should see a Netflix welcome screen that says "login or set-up your Netflix trial." The actual screen varies from device to device. Once you've deactivated the Netflix account, you can safely sell or give away the device.

Post comments here if it works - or doesn't work - for your particular device.

Wednesday, December 3, 2014

How to Transfer files from Smartphone or Tablet to Your PC?

It couldn't be simpler to get music, photo and movie files from your smartphone or tablet to your PC. There are several ways to do it, the most common of which we have described below:

Via Bluetooth:
  1. Enable your device's Bluetooth. For iPhone/iPad, go to Settings > General > Bluetooth. For Android devices, hit the menu button and go to Settings > Connections > Bluetooth.
  2. Enable your PC's Bluetooth. For Windows 7, click Start > Control Panel > Hardware and Sound > Bluetooth Devices. For Windows 8, press the Windows key + C > Settings > Change PC Settings > Wireless.
  3. On your phone, find the files you'd like to transfer.
  4. Go to the menu and select Send. If it prompts you, choose the via Bluetooth option.
  5. Select your computer in the list of devices that pops up.
  6. You may be asked for a passcode. Follow the instructions your computer gives you to accept the request.

Via Email:
  1. Make sure you are connected to the Internet, preferably via Wi-Fi so as not to incur extra charges.
  2. Attach the files you wish to send to a blank email and send it to yourself.

Via Android USB:
  1. Plug your Android device into your PC via its USB wire.
  2. Navigate to the USB Connected notification on your device's screen.
  3. Select Mount.
  4. On your PC, locate your device in Windows Explorer.
  5. Drag and drop the files you want to transfer from your phone to your computer.

Via Apple USB:
  1. Plug your iPhone/iPad into your PC via its USB wire.
  2. If it doesn't open automatically, launch iTunes.
  3. Click the Devices button in the upper-right corner. Corresponding tabs to the data on your device will appear.
  4. Configure the different content types in each tab.
  5. Click Apply in the lower-right corner of the screen to sync your data.

Via SD Card:
  • Locate the SD card in your device. This is usually in a slot in the side of your phone.
  • Plug it into your PC via the SD card slot.
  • Go to Windows Explorer and navigate to your SD card.
  • Open it and locate the files you would like to transfer to your PC.
  • Copy and paste them to the folder you would like to save them in.

Saturday, September 27, 2014

Microsoft Windows 9 will be free for Windows 8 users

The President of Microsoft Indonesia has stated that Windows 9 will be a free upgrade to existing Windows 8 users. The Technology Preview of Windows 9 is expected to launch next week. For Windows 8 users it will easy to obtain Windows 9.

As soon as the OS is released Windows 8 users only have to update their system. Windows 9 will then automatically be installed, according to the President of Microsoft Indonesia, Andreas Diantoro, in an interview with the Indonesian site Detik.


Microsoft has planned a press event next Tuesday (30th of September) where it willlikely announce Windows 9. The president of Microsoft France hinted that Microsoft's upcoming OS will be indeed called Windows 9, the OS was codenamed Threshold till now.

From screenshots and videos we know that Windows 9 will reintroduce the start menu but with Metro Live Tiles, it will be possible to run Metro applications in a desktop window and Windows 9 will introduce a notification center. Microsoft will also add its digital assistant Cortana to the OS.

Editor's Recommendation:
 
Source: Myce

Friday, September 26, 2014

How to downgrade from iOS 8 to iOS 7, How to reinstall iOS 8 if iOS 8.0.1 broke your iPhone

Is it possible to delete iOS 8 and go back to iOS 7? Yes - but time is limited. Here's our advice on downgrading your iPhone or iPad, including how to reinstall iOS 8 if iOS 8.0.1 broke your iPhone 6 or iPhone 6 Plus.


Can I remove iOS 8 from my iPad and iPhone, and reinstall iOS 7? I'm sure it's slowed them both down.

Removing iOS 8 (or any other version of iOS) and downgrading to the previous version is relatively straightforward, provided you do so within a few days of launch. There's a brief window (generally just a few days) after Apple releases a new full version of iOS, during which the company continues to 'sign' (or authorise) the previous version. In those few days you can downgrade reasonably easily.

In this article we show how to downgrade your iPhone or iPad from iOS 8 to iOS 7 - the pitfalls, the problems, and the preparations you can make before upgrading in the first place.

Update: iOS 8.0.1 has caused major issues for some iPhone users. We've added a section to this article that explains what to do if iOS 8.0.1 has broken your iPhone 6 or iPhone 6 Plus.

How to reinstall iOS 8 if iOS 8.0.1 has broken your iPhone 6 or iPhone 6 Plus?

Apple on 24 September released iOS 8.0.1, but quickly pulled the update when iPhone and iPad users reported major issues.

Many of those with iOS 8.0.1 installed found that they were no longer able to connect to their cellular network – instead they were faced with never-ending 'No Service.'

The Touch ID fingerprint scanner also suffered from the update, with some users finding that they could no longer unlock their iPhone with the technology – instead being forced to use their passcode.

Apple has said: "We have a workaround for iPhone 6 and iPhone 6 Plus users who lost cellular service and Touch ID functionality after updating to iOS 8.0.1. Affected users can reinstall iOS 8 through iTunes."

"We apologise for the great inconvenience experienced by users, and are working around the clock to prepare iOS 8.0.2 with a fix for the issue, and will release it as soon as it is ready in the next few days."

Below is a list of the bugs Apple's iOS 8.0.1 update aimed to fix, as described in Apple's Software Update release notes.
Fixes a bug so HealthKit apps can now be made available on the App Store.
Addresses an issue where 3rd party keyboards could become deselected when a user enters their passcode
Fixes an issue that prevented some apps from accessing photos from the Photo Library
Improves the reliability of the Reachability feature on the iPhone 6 and iPhone 6 Plus
Fixes an issue that could cause unexpected cellular data usage when receiving SMS/MMS messages
Better support of Ask To Buy for Family Sharing for In-App Purchases
Fixes an issue where ringtones where sometimes not restored from iCloud backups
Fixes a but that prevented uploading photos and videos from Safari.

If you've got an iPhone 6 or an iPhone 6 Plus and have found that iOS 8.0.1 has broken it, Apple has provided instructions for a "workaround."

The first thing you'll need to do is make sure your version of iTunes on your Mac or PC is up to date by going to iTunes > Check for Updates, then connect your iPhone to iTunes.

Make sure your iPhone is backed up to iTunes (Apple says iCloud backups won't restore to earlier versions).

On Apple's support page, you'll find links to files that you'll need to download depending on which device you've got.

You can then open iTunes, and press the Option key (Mac) or Shift key (PC) and click Check for Update.

Then press Update, and iOS 8 will be reinstalled on your iPhone.

If you've got iOS 8 and want to go right back to iOS 7, you can do so too. Read on to find out how.

Downgrade iOS 8 to iOS 7: Back up. Really! Back up now

During the reinstallation process, iOS will wipe all of the apps and data from your iPhone or iPad (except for the undeletable, stock apps). Make a backup of the device - in iTunes or iCloud - before you begin the following procedure.

Downgrade iOS 8 to iOS 7: Get an .ipsw file for the previous version of iOS 7

To reinstall iOS 7, you need the relevant .ipsw file - in this case you're looking for 7.1.2.ipsw. If it's stored on your hard drive you can find it by following the path youruserfolder/Library/iTunes/ and then within a folder called iPad Software Updates, iPhone Software Updates or iPad Software Updates.

If you can't find the latest one on your Mac - which is fairly likely, giving the Mac's tendency to delete them periodically - then don't worry. Simply run a search for download ipsw and select and download the appropriate file for your device. There are plenty of sites to choose from.

Downgrade iOS 8 to iOS 7: Open the .ipsw file

Assuming that Apple is still signing iOS 7, the following steps should be fairly easy. Plug your iPhone or iPad into your Mac (or PC - the steps are essentially the same), then launch iTunes. Click on your device in the iTunes interface and select Summary. Now hold down the Alt/Option key, and click the Restore button. (You'll need to disable the Find My feature on the device if you've enabled it.)

Now navigate to the iOS 7.1.2.ipsw file and click Open. The Mac will now reinstall iOS 7 on your iPad or iPhone.

Downgrade iOS 8 to iOS 7: If necessary, go into Recovery mode

There are some potential obstacles, however.

If iTunes says you're already running the latest version of iOS on your device, you may need to use Recovery mode. Shut down the device, plug one end of the syncing cable into your computer and hold down the Home button on the iPhone/iPad while you connect the cable to it. When the Connect to iTunes screen appears, release the Home button.

iTunes will say that your device is now in Recovery mode. Hold down the Option key (Alt), click Restore, navigate to the iOS 7.1.2.ipsw file, and install it on your device.

Downgrade iOS 8 to iOS 7: How to tell if Apple has stopped signing iOS 7

At some point in the next few days, Apple is going to stop signing iOS 7, and this procedure will get a lot more complicated.

If you get an alert that says this version of iOS is not compatible with your device, that means Apple has closed the window. You're probably stuck with iOS 8, but we'll look into any remaining methods of downgrading when we next update this article.

Good luck!

You can continue reading the advice we gave to beta testers before iOS 8 launched to the public. Some of this advice is now out of date...

How to remove the iOS 8 beta and go back to iOS 7?

Now we'll deal with the early birds - the ones who joined the iOS 8 beta programme and installed iOS 8 early.

You're the lucky ones when it comes to downgrading, because iOS 7 is still the newest officially supported operating system (iOS 8 hasn't launched officially yet) and will therefore be the software your iPhone or iPad will be restored to if you select the iTunes option to Restore and Update. But we'll get into that in a moment.

The only issue is that you'll have to restore from a pre-iOS 8 backup, so any data or preferences you've saved since then will be lost - and if you haven't got a backup from your iOS 7 days, you won't be able to restore your data at all. In that case all your data will be lost and you'll have to go back to a factory-default 'new iPhone' setup. Something to consider.

Anyway, removing the iOS 8 beta is simple. Hold the Home button (on the front, below the screen) on your iPhone or iPad, and then (when it says 'Connect to iTunes'), do exactly that - plug it into your Mac and open up iTunes.

iTunes will tell you that it's detected an iPhone or iPad in Recovery Mode, and that this needs to be restored - click OK to agree to this, and then Restore iPhone or Restore iPad (as appropriate). Finally, choose the option to Restore and Update.

iTunes will download the latest version of iOS 7 and install it on your Apple device.

But things will be more difficult once the full version of iOS 8 launches. Here's our prediction of what the downgrading process is likely to be like come the autumn:

How to downgrade from iOS 8 to iOS 7: The easy method

With iOS 7 there was an easy method of downgrading to the previous operating system, and a difficult one. But the easy one was only possible for early beta testers, and for a week or so after public access was opened. Around the 21st of September 2013, Apple stopped 'signing' (allowing) pre-iOS 7 operating systems for installation. Apple may run things differently with iOS 8 (there's been a lot of user anger at the inability to easily downgrade to iOS 6), but expect downgrading to get harder - if you desperately want to reinstall iOS 7, do so early.

We'll start with the easier downgrade method that used to be possible with iOS 7, and may well work in the early days with iOS 8. 

You can download the required .ipsw (iPhone/Pad/Pod software) file for your chosen version of iOS fromJustaPenguin or a similar site. (That site also lists which versions of iOS are usable for each iOS device.)

Because you're not downloading the software from Apple itself, we should check it's safe. (If you're feeling reckless, you can skip this step.) In Apple OS X, use Terminal to verify that the file you've downloaded has not been corrupted.

After you've downloaded the .ipsw file, run the following command:

/usr/bin/openssl sha1 path/to/file

You can type or paste just the '/usr/bin/openssl sha1' part of the command, then drag-and-drop your .ipsw file to the Terminal window to complete the path to the file itself.

Compare the alphanumeric string you see with that published on trusted sites. We looked at a few sources: The iPhoneWiki as well as our source download site of Icj.

Satisfied that you have an genuine firmware file, plug your iPhone or iPad into your Mac by its USB cable. Launch iTunes. Click on the device icon in the top-right corner.

Hold down Option or Alt key, and click on the button labelled Restore iPhone...

An open file dialog window appears. Navigate to your downloaded .ipsw file and click Open. Then let iTunes do the rest. You should have an iPad or iPhone restored to iOS 6 after a few tens of minutes. (If you have Find my iPad or Find my iPhone activated, you will be asked to deactivate this first.)


How to downgrade from iOS 8 to iOS 7: The hard method

And here's a radically simplified version of the hard method, which currently is the only way to downgrade from iOS 7 to iOS 6. It's best to assume, when you upgrade to iOS 8, that it will be just as hard as this to go back. Upgrading iOS should be viewed as a major commitment.

Make sure you've got:
  • An iPhone 4
  • A Windows computer
  • iTunes 11.0.5 or earlier
  • Saved SHSH blobs for iOS 6.1.3 or earlier
  • iFaith (a jailbreaking software tool - available from GitHub.)

[Here's how to save your SHSH blobs. If you haven't been saving your SHSH blobs - and if you're not a jailbreaker there's not really any reason why you would - then don't be tempted to look for them online. They're created specifically for the chip in your iOS device so you won't be able to use someone else's. And what's more, people often use SHSH blobs as a lure to spread malware or scam people out of money.]
  1. Back up your iPhone
  2. Connect your iPhone 4 to the Windows computer
  3. Start iFaith and select 'Build signed IPSW w/ blobs', 'Browse for SHSH blobs' and select the one you saved or found with iFaith earlier
  4. To get the iOS firmware file, choose 'Download it for me', and then (when it's finished) 'Build IPSW'
  5. Note the name of the IPSW file, then select OK
  6. Hold the sleep button your iPhone, then slide to power off. Press Start in iFaith and follow the instructions to put the iPhone into DFU mode
  7. Start up iTunes (version 11.0.5 or earlier, remember) and - after it detects your iPhone - click OK
  8. Hold Shift and click 'Restore iPhone' under Summary. Find the IPSW file and select it
  9. Follow remaining instructions


How to downgrade from iOS 8 to iOS 7: The beta programme

One thing you can consider is joining the developer beta programme, which Apple will announce alongside the new software. This is the scheme that lets app developers download and try out beta versions of iOS 8 ahead of its public launch, so that they can make their software work with it.

You'll get bragging rights (I've got the latest version of iOS on my iPad, and it hasn't even been released yet!), you can have a proper go on it ahead of launch to see if its broad design changes are to your liking, and downgrading will probably be easier for you than it will be for the general public.

But joining the beta costs money, and the versions of iOS 8 you'll get access to won't be finished. And you're not supposed to publish information about it (and certainly not reviews) ahead of launch - you'll have to sign a non-disclosure agreement. 

How to downgrade from iOS 8 to iOS 7: How to prepare for upgrading

The fact that we're discussing this before Apple even announces iOS 8 gives us an advantage - we haven't upgraded yet, and we can prepare for the launch. What should you do to make sure that upgrading is right for you, and to boost your chances of being able to go back if you don't like it?

In fact, we discuss this elsewhere in some detail (see How to prepare for the iOS 8 launch), but the gist of our advice would be:
  1. Don't upgrade unless you're sure - check the reviews, try it out on friends' devices, and make sure you're reading advice specific to your model of iPad or iPhone (older models may not get all the features, for instance, or may suffer from performance problems).
  2. Consider joining the beta programme in advance, as discussed above.
  3. Save your SHSH blobs before upgrading.
  4. If you do upgrade, don't do it on launch day - there will be heavy traffic on Apple's servers, and you won't get a chance to try it on your mates' phones.
  5. Equally, don't leave it too long. If there's a honeymoon period at the start when downgrading is easier (as there was with iOS 7) it probably won't last long.

Finally, we'd add a word of comfort to those who do upgrade and then find themselves unable to go back. First, an iOS upgrade is a major thing that underpins everything you do with your smartphone or tablet, and so it's likely to take a while to get used to it. This is particularly true with aesthetic updates. Second, Apple won't sit still; expect updates to iOS 8 that solve some or all of the most highly publicised gripes and issues.

How to downgrade from iOS 8 to iOS 7: Why does Apple make it so hard to go back to an older version of iOS?

Because it's easier to support a user base that’s concentrated on a small number of software platforms. (Compare things in the more fragmented and confusing world of Android.) Because it’s easier for developers to build apps for such an audience. Because users on the latest software make the best evangelists for an ecosystem of products. (Look! My iPhone has AirDrop!) And, probably, because encouraging people to use the latest software in turn encourages them to upgrade their hardware.

How to downgrade from iOS 8 to iOS 7: Should you upgrade?

It’s obviously too early to speak specifically about iOS 8, which we can only speculate about. But as a general rule iOS upgrades are something to take seriously - they fundamentally alter your experience with a very expensive piece of consumer hardware, and often can’t be undone.

I'm a fan of iOS 7, and love trying out new features and getting used to a new look. But it can be unpleasant at first, and some people have never grown accustomed to iOS 7's design. Just because it's called an upgrade, don’t assume it’s guaranteed to be an improvement.


Editor's Recommendation:

Source: Macworld

Thursday, September 25, 2014

Apple releases iOS 8.0.2 to fix nearly useless iPhone 6 models

A fix to the botched update is here


Apple has released iOS 8.0.2, a new OS update that promises to fix some issues introduced in iOS 8.0 — but more importantly, quite the mess it left behind with iOS 8.0.1. That update went out earlier this week, and was quickly yanked by the company after iPhone 6 owners discovered their phones no longer connected to cellular networks, and that their Touch ID buttons no longer scanned for fingerprints.

Workarounds let people revert back down to iOS 8.0, but required access to a computer with iTunes, and a copy of Apple's iOS firmware file, leaving many in a lurch. According to a person familiar with the matter, less than 40,000 people downloaded the iOS 8.0.1 update and it was available for under an hour before Apple pulled it.

iOS 8.0.2. brings the same change list as the botched update, including a fix for a bug that kept Apple from releasing any HealthKit-compatible apps in the App Store, as well as one that promises to make the iPhone 6 and 6 Plus' reachability feature more reliable. The full list includes many others:
  • Fixes an issue in iOS 8.0.1 that impacted cellular network connectivity and Touch ID on iPhone 6 and iPhone 6 Plus
  • Fixes a bug so HealthKit apps can now be made available on the App Store
  • Addresses an issue where 3rd party keyboards could become deselected when a user enters their passcode
  • Fixes an issue that prevented some apps from accessing photos from the Photo Library
  • Improves the reliability of the Reachability feature on iPhone 6 and iPhone 6 Plus
  • Fixes an issue that could cause unexpected cellular data usage when receiving SMS/MMS messages
  • Better support of Ask To Buy for Family Sharing for In-App Purchases
  • Fixes an issue where ringtones were sometimes not restored from iCloud backups
  • Fixes a bug that prevented uploading photos and videos from Safari

  • It remains unclear what exactly went wrong with iOS 8.0.1's release. Users proceeded to do an update through iTunes (before Apple removed it) reported no problems. However those who installed it using the over the air update feature ran into the issues immediately.
Source: THE VERGE

Editor's Recommendation: 

Did Apple's iOS 8.0.1 update break your iPhone? Here's a fix that works

Make phone calls and use Touch ID again


Apple's latest update to iOS 8 is keeping some iPhone owners from being able to use their iPhones as a phone, or use Touch ID. Users on multiple cellular networks are reporting the connectivity issue unfixed after restarting their devices, toggling airplane mode, and by resetting all networking settings. The same goes for Touch ID, which can be used to unlock the phone, and validate a user's identification in Apple's stores and inside apps as part of iOS 8. That feature has been disabled system-wide, and attempts to remove and re-add fingers result in a "failed" message.


Apple's already said it's investigating the issue, but if you're one of the unlucky souls who downloaded and installed it, there's a simple trick (via iMore) for getting your phone back up and running, without wiping anything.

"APPLE'S WORKING ON A FIX, BUT IT'S NOT HERE YET"

Things you'll need: Your broken iPhone, a PC or Mac with iTunes installed, a Lightning to USB cable, and an internet connection.

Step 1. Go download a fresh copy of iOS 8.0. You can get it from ipswdownloader.com. Pick your device and model, which is super easy if you're on an iPhone 6 or 6 Plus, since there's only one firmware for each (direct downloads for:iPhone 6iPhone 6 Plus).

Step 2. While that's downloading, go to Settings > iCloud > Find My iPhone on your iPhone and turn the service off. You'll need to enter your Apple ID and password to do this.

Step 3. Fire up iTunes with your iPhone plugged in, then click on the "iPhone" from the source menu on the top right.


Step 4. Click the "Check for Update" button while holding Option (on a Mac) or Control (for Windows users) key.


It will pop up with a file menu where you pick the firmware (which will be an .ipsw file), then hit OK.

Your phone will proceed to install iOS 8.0 as an "upgrade," but won't actually change any of your settings or affect your data. Checking the iOS about menu once it's done will also confirm that you're actually running iOS 8.0, and not 8.0.1.

If you're having issues getting the install to start, one option is to do a full restore, which requires setting your iPhone into recovery mode. It also means restoring from a backup, which could be a problem if you're trying to restore from a backup of 8.0.1 on a phone running 8.0. If you can wait, it might be worth seeing if Apple pushes out an update for the update sometime later today. For everyone else, enjoy making phone calls again — on your phone.

Editor's Recommendation:
 

Wednesday, September 24, 2014

Reversible USB can also connect your 4K screens

Type-C connectors will be able to do more than transmit data 


The next generation of USB connectors might extinguish the need for dedicated display ports. The Video Electronics Standards Association (VESA) recently announced that DisplayPort technology will allow the upcoming Type-C USB connectors to relay audio and video signals, with the potential to drive monitor resolutions of up to 5K.

This is accomplished through the Alternate Mode extension detailed in the USB Power Delivery 2.0 specification, which permits non-USB signals to be sent over the connector. The DisplayPort Alt Mode will be able to use one, two, or four of the Type-C's USB SuperSpeed lanes to transmit DisplayPort signals, while still allowing data and power to be transferred. AnandTech writes this creates room for devices that can use this functionality in "a fashion similar to ThunderBolt" but with "the closer co-operation of the USB-IF and the superior Type-C physical layer." Coupled with its ability to transfer high-wattage power, the Type-C could potentially become a true single cable solution.

According to a press release from VESA, it will even be possible for devices supporting DisplayPort Alt Mode to drive a HDMI, DVI or VGA display through the use of appropriate adaptors. The feature could also prove advantageous for space-starved laptops and tablets that could eschew dedicated video ports for the new multipurpose USB. Unlike Apple's Lightning connectors, however, the new connectors aren't on the market just yet, but production for the reversible USB connectors looks to be imminent with the completion of the Type-C specification last month.

Source: THE VERGE

Editor's Recommendation: