In this article, we will show you how to delete photos from the iPhone photo library as well as how to recover deleted photots from iPhone (include iPhone 6s/6 plus). We will explore the various options we have for not only deleting photos one by one, but also for deleting all pictures from an iPhone at once. All this information applies to the iPad too.
I hadn't even started typing the title of this post that I could already imagine the comments from witty readers. Of course you know how to delete photos from your iPhone. We all do. It's so basic even my mom can do it without having to ask for directions.
Yet, deleting pictures directly from your iPhone can be a tedious task if your ultimate goal is to batch remove hundreds, maybe even thousands of photos. In this post, we will show you how to delete photos from the iPhone photo library. We will explore the various options we have for not only deleting photos one by one, but also for deleting all pictures from an iPhone (like iPhone 5S, iPhone 5C, iPhone 5, iPhone 4S, iPhone 4, iPhone 3G) at once.
Note: All this information applies to the iPad too. The process is exactly the same no matter if you want to delete photos from iPad or iPhone. If you want to delete photos from your iPad (include iPad Air, iPad Mini 2, iPad 4, iPad 3, iPad Mini, iPad 2, iPad), just follow the instructions below and you'll be all set.
If you think you already know it all, I encourage you to take a peek at this post because you might still learn a thing or two…
- Part 1: How to delete photos one by one from iPhone?
- Part 2: How to delete multiple photos directly from iPhone
- Part 3: How to quickly select and delete multiple photos?
- Part 4: How to delete photo albums from iPhone?
- Part 5: How to delete photos from iPhone after importing them?
- Part 6: How to delete all photos from iPhone?
- Part 7: How to recover deleted Photos from iPhone (include iPhone 6s/plus)?
Part 1: How to delete photos one by one from iPhone?
Chances are you already know how to delete individuals photos from your iPhone or iPad, but for the sake of providing comprehensive information, we will explain how to do that here anyway.
1. Launch the Photos application.
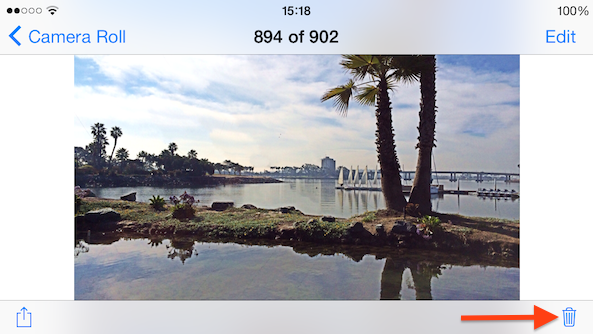
2. Tap on a photo you want to delete.
3. Tap on the Trash icon at the lower right corner of the screen.
4. Your iPhone or iPad will ask you to confirm whether you really want to delete the photo, or if you want to cancel. Tap “Delete Photo.” The photo will be deleted from your iPhone for good.
Part 2: How to delete multiple photos directly from iPhone?
There are two ways to quickly delete multiple photos at once from your iPhone. The first way has you manually select each and every picture you want to delete. The other way will be described in the next section.
1. Launch the Photos application.
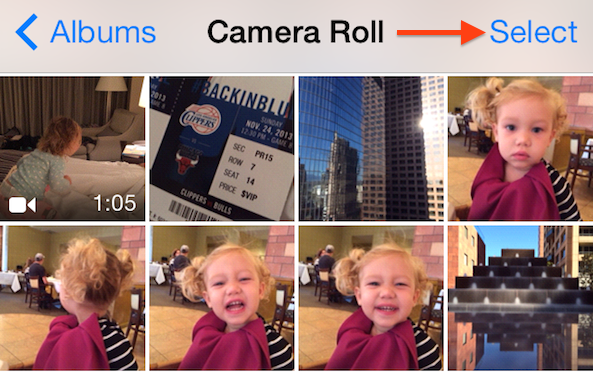
2. Go to the Camera Roll.
3. Hit the "Select" button in the upper right corner of the screen.
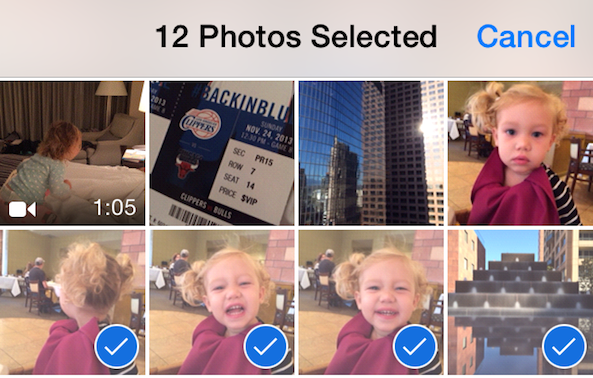
4. Tap to select each photo you want to delete.
5. Once you have selected all the photos you want to remove from your iPhone, tap on the Trash icon in the lower right corner of the screen.
6. You will be asked to confirm to delete the pictures one last time before your pics are deleted forever.
Part 3: How to quickly select and delete multiple photos?
The other way to quickly select and delete several photos from your iPhone at once is a little less known, but is probably more effective as it allows you to select multiple photos in one tap.
1. Launch the Photos application.
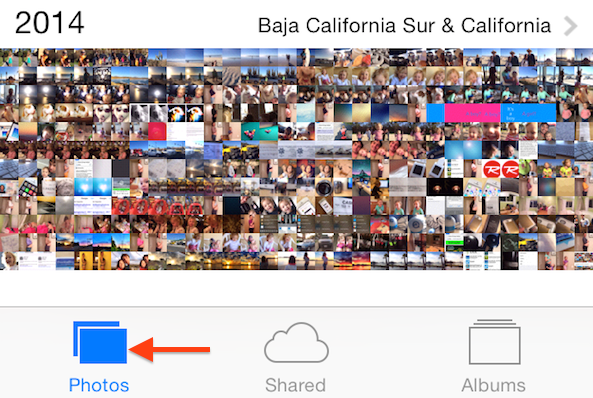
2. Tap on the "Photos" tab at the bottom of your screen.
3. Although it might not be very obvious at first, you'll see that the Photos tab hierarchically organizes your photos by Years > Collections > Moments. To navigate through this hierarchy, and depending where in this hierarchy you're at, you need to get into "Moments." If you currently are in the "Years" view, all you'll have to do is to tap on the mosaic of photos from a specific year, then scroll and tap on a specific collection, then you'll be taken to the "Moments" view. I understand it can be confusing to read this, but it will make sense if you have your iPhone in your hands.
4. Once you are in the Moments view, tap the "Select" button in the upper right corner.
5. You'll notice that now, each Moment has a smaller "Select" button associated to it. Tapping on the Select button of a specific Moment selects all the photos in this Moment. A Moment can easily be deselected simply by tapping on the "Deselect" button.
6. After selecting as many Moments as you want, tap on the Trash icon at the bottom right of the screen. All the photos you've selected will be deleted from your photo library.
Part 4: How to delete photo albums from iPhone?
Deleting a photo album on your iPad or iPhone doesn't actually delete the photos associated with this album from your Camera Roll, but I thought it would be good to add this quick tip in there as well.
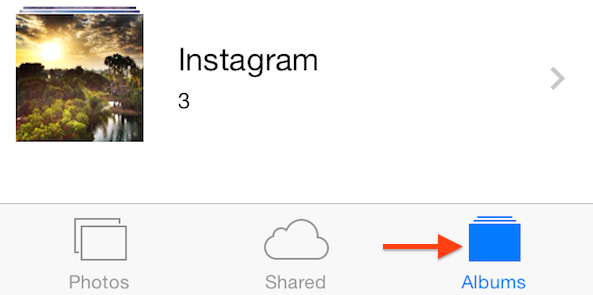
1. Go to the Photos app. Tap on the "Albums" icon at the bottom of the screen, and make sure you are in the list view of all the albums on your iPhone.
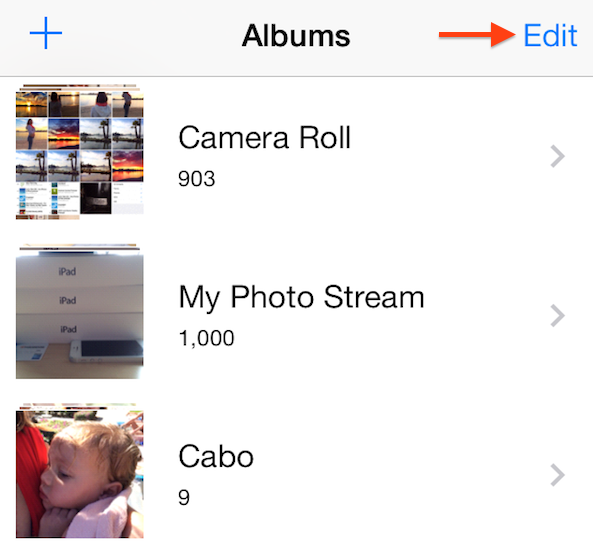
2. Tap the "Edit" button at the upper right of the screen.
Deletable albums will then get a small red Delete icon associated with them.
3. Tap on the red Delete icon of the album you want to delete. Then tap on the big Delete button to the right of the album.
4. You will get a pop up warning to confirm you indeed want to delete this album. Tap "Delete Album."
Again, it must be noted that only the album will be deleted. All the photos that were in this album will remain in your Camera Roll until you delete them from there.
Part 5: How to delete photos from iPhone after importing them?
Most Mac users use iPhoto to manage their pictures. Admittedly, iPhoto is one of my least favorite piece of software. I find it slow and confusing, but sometimes it really helps get the job done. If you use iPhoto to import your photos in your Mac, there is a handy little feature that will help you delete the photos from your iPhone after import.
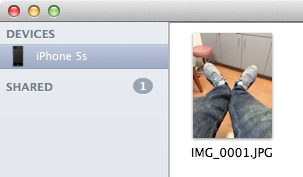
1. Launch iPhoto on your Mac, and plug your iPhone in.
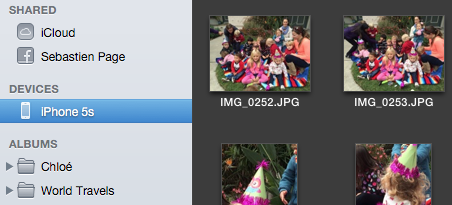
2. Your iPhone or iPad should be selected by default, but in case it is not, make sure your iPhone is selected from the "Devices" list in the left navigation bar.
3. Click on "Import Photos" in the upper right of the iPhoto app. This will import all your photos into iPhoto. Obviously, this could take a while, especially if, like me, you have 900 photos to import.
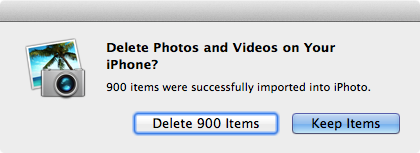
4. Once the import has been completed, iPhoto will automatically give you the option to delete imported photos from your iPhone.
5. Click on "Delete Items." All the photos will then be removed from your iPhone.
Part 6: How to delete all photos from iPhone?
Here we are. The following method is without a doubt the fastest and most efficient way to mass delete photos from your Camera Roll. You can choose to delete one or hundreds of photos at once, and get the job done in less time that it takes to say it.
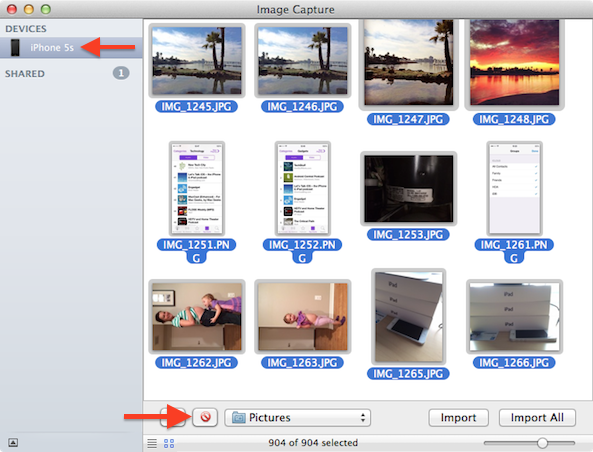
1. Plug your iPhone in your Mac. Launch the application called Image Capture. You might not have heard of it before, but it comes with all Macs. It should be somewhere in your Applications folder.
Note to Windows users: I do not have a Windows machine to test this on, but if my memory is correct, you can achieve the same thing by going to "My Computer" and look for your iPhone, which should appear as cameras normally do on PC. Don't quote me on this though. Hopefully, some commenters that have a Windows PC will be able to give us more details about that.
2. Make sure your iPhone or iPad is selected from the "Devices" list in the left navigation bar.
3. Select as many photos as you want to delete. If you want to delete all of them in one scoop, hit the "Command + A" keys on your keyboard to select all photos.
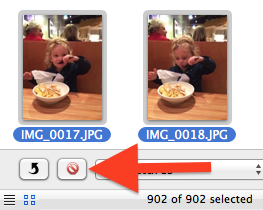
4. Click on the red delete icon at the bottom of the screen.
5. You will get one last chance to stop the mass removal of your pictures. Image Capture will ask you if you're sure you want to delete the selected items permanently. Click Delete. All the photos will be wiped from your iPhone or iPad.
Conclusion
As you can see there are many ways to delete photos from your iPhone or iPad. Unfortunately, there is still no quick and easy way to delete all photos that are on your iPhone directly from the device. iOS 6 used to have an option that would allow you to delete all photos directly from the Settings app of the iPhone or iPad, but this feature is gone since the release of iOS 7. If it ever comes back, I'll make sure to update this post accordingly. In the meantime, the methods described above are you best bet to delete pix one by one from your iPhone, or to delete all of them at once.
If you know about some apps that let you batch delete photos from your iPad or iPhone, please let me know. I've been looking for them but never found any.
Part 7. How to Recover deleted photos from iPhone (iPhone 6s/6 Plus Included)?
If you want to get them back eagerly, it's not a big deal now. With a right way, you can still retrieve them with original quality. Wondershare Dr.Fone for iOS - iPhone/iPad/iPod Data Recovery (Windows & Mac) provides you with three ways to retrieve deleted photos from iPhone 6s (Plus)/6 (Plus)/5S/5C/5/4S/4/3GS.
- Retrieve photos directly from iPhone, iTunes backup and iCloud backup.
- Recover deleted photos from Camera Roll, Photo Library and Photo Stream.
- Preview and selectively recover photos in original quality.
- Supports iPhone 6s, iPhone 6s Plus and the latest iOS 9 New icon.
Note: For photos lost on iPhone 4s and above, please try to recover them from iTunes backup file or iCloud backup file.
Download the trial version to your computer to see whether it can find your wanted Photos.

 Check detailed solutions below.
How to Recover deleted Photos from iPhone in 3 Ways?
Method 1. Directly Recover deleted photos from iPhone
Step 1. Connect your iPhone and scan it
After in stalling the program on your computer, run it. Then connect your iPhone to the computer. When the program detects your iPhone, follow the description in the window to "Start Scan" scanning your iPhone.
Check detailed solutions below.
How to Recover deleted Photos from iPhone in 3 Ways?
Method 1. Directly Recover deleted photos from iPhone
Step 1. Connect your iPhone and scan it
After in stalling the program on your computer, run it. Then connect your iPhone to the computer. When the program detects your iPhone, follow the description in the window to "Start Scan" scanning your iPhone.
Step 2. Preview and recover photos from your iPhone
When the scan stops, you can preview and check all data available to recover in the scan result. To recover photos, you can preview every item in the categories of Camera Roll, Photo Stream and App Photos. Preview them one by one, and tick the item you want. Then click on the Recover button to save them on your computer with one click.
 Method 2. Recover deleted photos by extracting iTunes backup
Step 1. Choose and extract the iTunes backup
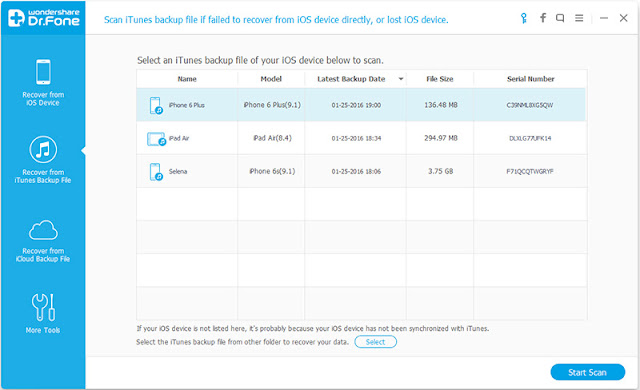
After running the program, switch to Recover from iTunes Backup File by clicking on the option on the top of the window. Then the program will detect all iTunes backup files existing on your computer and present them all for your option.
Choose the one for your iPhone and click on the Start Scan button to begin extracting the backup. The extracting process will take you about 5 seconds.
Method 2. Recover deleted photos by extracting iTunes backup
Step 1. Choose and extract the iTunes backup
After running the program, switch to Recover from iTunes Backup File by clicking on the option on the top of the window. Then the program will detect all iTunes backup files existing on your computer and present them all for your option.
Choose the one for your iPhone and click on the Start Scan button to begin extracting the backup. The extracting process will take you about 5 seconds.
Step 2. Preview and recover your iPhone photos
In the scan result presented by Wondershare Dr.Fone for iOS, you can check all recoverable data one by one in detail, such as photos, contacts, messages, notes, call log and more. Just tick whatever you want during the preview. Then save them on your computer with only one mouse click on the Recover button.
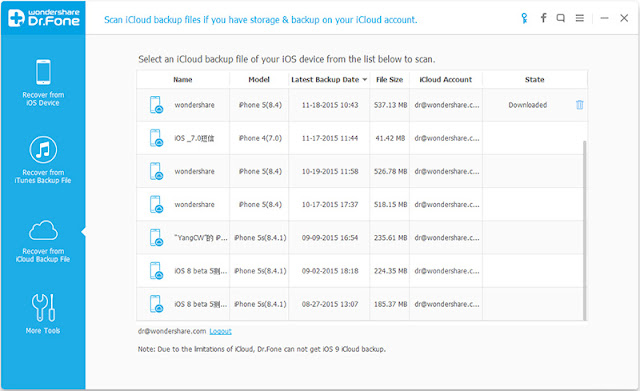
 Method 3. Recover iPhone photos from iCloud backup
Step 1. Download and extract the iCloud backup file
Choose the recovery mode of Recover from iCloud Backup File, and then you can enter your Apple ID and the password to log in. After that, the program can automatically find all backup files existing in your iCloud account. Choose the one you want to recover iPhone photos from to download and extract it. It will take you some time. Just wait and keep the internet connected.
Method 3. Recover iPhone photos from iCloud backup
Step 1. Download and extract the iCloud backup file
Choose the recovery mode of Recover from iCloud Backup File, and then you can enter your Apple ID and the password to log in. After that, the program can automatically find all backup files existing in your iCloud account. Choose the one you want to recover iPhone photos from to download and extract it. It will take you some time. Just wait and keep the internet connected.
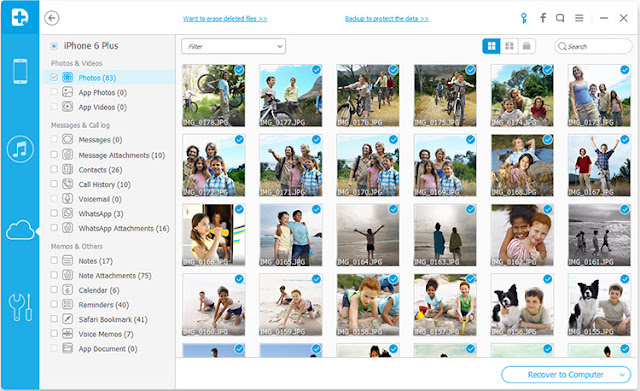
Step 2. Preview and recover your iPhone photos
Once the scan is complete, you can access and preview the content in your iCloud backup in detail. For photos, you can check Camera Roll and App Photos. Preview them one by one and tick the item you want. Then click on the Recover button to save them on your computer.
 Important things you should know:
1. For people whose iPhone stuck in white screen of death or recovery mode while upgrading iPhone to iOS 9, you don't need to recover photos from iPhone now! All you need is to check how to fix iPhone white screen of death or how to get iPhone out of recovery mode. For sure, after learning the ways, your iPhone will be turned into normal mode.
2. If you lost photos from your iPhone 6s, iPhone 6s Plus or any other iPhone running in iOS 9, you should tap Photos app and go to Recently Deleted folder to check out whether these lost photos are there or not. If they are there, you can restore them right away. If there are not there, you should follow the ways below to recover photos.
Editor’s Recommendation: