Friday, April 25, 2014

How to Convert AAC to MP3 Using iTunes?

Music bought from the iTunes Store comes in the AAC digital audio format. While AAC is thought by many to be superior to MP3, it isn't compatible with as many devices as MP3 (though AAC works pretty widely). As a result, you may want to convert from AAC to MP3 to make sure your music works with all your devices. If you use iTunes, here's how to do it.
Difficulty: Average

Time Required: A few minutes

How to Convert AAC to MP3 Using iTunes?

1. To begin, you have to make sure iTunes is set to create MP3 files (its encoding functions allow you to create many kinds of files, including AAC, MP3, and Apple Lossless). To do this, you'll need to open the Preferences window. On Windows do this by going to Edit -> Preferences. On a Mac go to iTunes -> Preferences.

2. In the Preferences window that pops up, click the "Import Settings" button towards the bottom of the General tab. You'll find it next to the "When you insert a CD" drop-down box.


3. In the Import Settings window that pops up, choose MP3 Encoder from the "Import Using" drop-down. You'll also want to choose something in the "Setting" menu. The higher the quality setting, the better the converted song will sound. I'd recommend 192 kbps or 256 kbps, and certainly nothing lower than the current bit rate of the AAC file to be converted. When you're happy with your settings, click "OK." Click "OK" in the Preferences window to close that.


4. Next, find the song or songs you're converting from AAC to MP3 in iTunes. You can select songs one at a time, in a group by using Control-A on Windows and Command-A on a Mac, or in a group of non-contiguous files by holding down Control (on Windows) or Command (on Mac) while you click each file.

5. When you've selected all the files you want to convert from AAC to MP3, you have two choices for how to begin the conversion:
  1. Click on the File menu in iTunes, then Create New Version, and select "Create MP3 Version", OR
  2. Right click on the selected files and choose "Create MP3 Version" from the pop-up menu.

When you click on one of those options, the conversion will begin. How long it takes will depend on how many songs you're converting and the conversion settings.

6. When the conversion from AAC to MP3 is complete, you'll have two copies of each converted file, one in AAC, the other in MP3. You may be happy to have both copies. If not, though, and you want to delete one, you'll need to know which is which. In that case, select the file you're curious about and hit Control-I on Windows or Command-I on a Mac. This will pop up the song's information window. The Kind field will tell you whether the song is an AAC or MP3.


Additional - iTunes Alternatives

Aimersoft DRM Media Converter - A Simpler & Faster iTunes Alternatives to Play Music Heartedly. (See also DRM Removal Review)
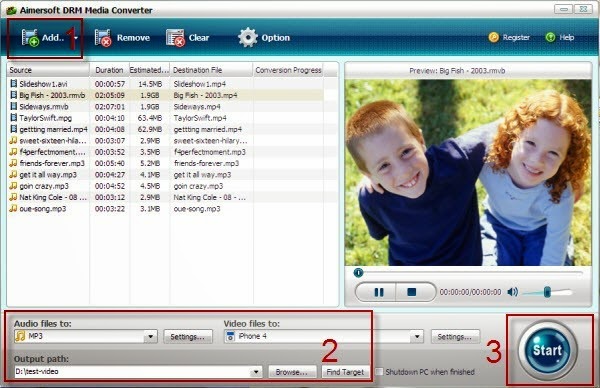


The best DRM Audio/Video Converter Makes it easier for users to convert AAC to MP3. Meanwhile, it can also remove DRM protection from music/video files and converts them to popular audio/video formats for playback on any iDevices (breaking down iTunes' limitations for sharing songs/videos among computers and devices), Google Nexus 9Surface Pro 3, Surface Pro 3, Samsung Galaxy Note 3, Note 4, Galaxy Note 5, Galaxy Tab S, Galaxy S7/S6/S5/S4/S3, Hudl 2, Nabi 2, HTC One MP9/10, Galaxy Tab A, most Audio/Video players and so on.

By removing the DRM protection of iTunes(. m4v), Amazon(.wmv), Digital Copy and Windows Media Player (. wmv, . asf) files, Rekusoft Music Converter is able to convert any audio to the most common and popular audio formats, such as WMA, lossless FLAC, M4A, M4B, AAC, AC3, WAV and MP3. See the following picture:
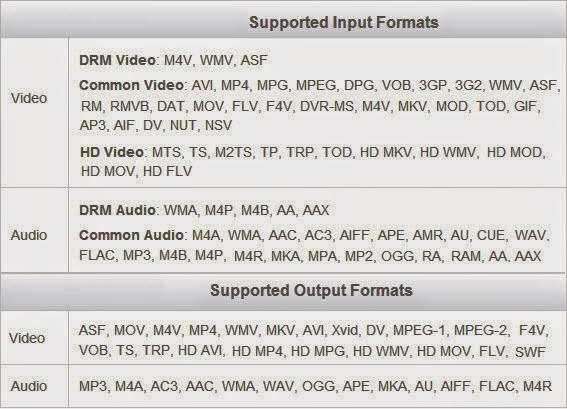


It does not only convert protected audio/video files to other formats, but also non-protected audio/video files to other formats.
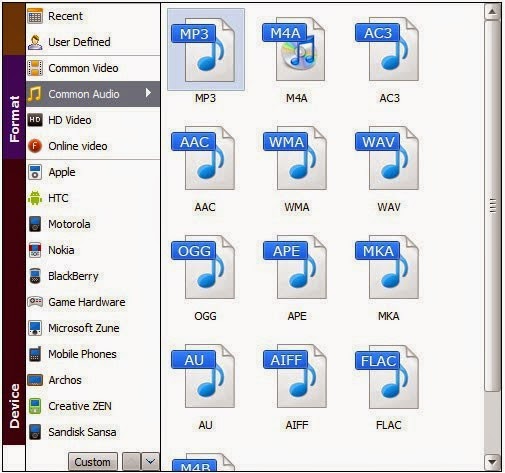


You will be able to customize several parameters like sample rate, bit rate and audio channel and count with support for dual-core or multi-core processors.

Now you can enjoy the mp3 music on your Player wherever and whenever. Simple settings, high speed, and friendly interface.

Suitable for home users and company users to convert AAC audio format to MP3 audio format.

            ($35.95)

Suggested Reading

Thursday, April 24, 2014

iWant: Improvements to Music Apps in iOS 8

Over at MacStories, Federico Viticci has a great list of wishes for iOS 8. He's mentioned a couple of things that would be nice to see regarding music playback. He discusses the lack of an Up Next on iOS. There used to be an On the Go playlist (I wrote about this for Macworld back in 2010, but Apple removed that feature in iOS 7), and it would be great to have something other than Genius playlists.

He also points out how difficult it is to add a song to a playlist; this is the same for creating playlists. While I don't do this often, it is something I like to be able to do, and would like to do it more easily. What the Music app needs is a tap-and-hold gesture to access a sort of contextual menu. This menu could let you add songs to playlists, or create playlists, as well as, perhaps, offer features such as creating Genius playlists or iTunes Radio stations. This said, it would be a hidden gesture, and I find such gestures problematic.

But there are other improvements needed as well. First, the ability to delete entire albums. It's hard to understand why this was removed from iOS. If you're using iTunes Match, and need room to download a new app, a movie, or even update iOS, it can be practical to be able to delete music more than just one song at a time.

There also needs to be a way to see entire titles of songs and albums. Again, this used to be the case, but with iOS 7, this was removed. (And in the screenshot to the left, taken from the above article, you'll see how a tap-and-hold menu looks.) Not only do you not see song or album names in lists, but you don't even see them when you're playing music.

I'd like to see the iTunes Radio app split from the Music app. I'd rather have a separate icon for iTunes Radio to easily start playing a radio station, rather than navigate in the Music app.

Finally, there's a bug in the Music app, which combines music from different genres under artists. Let me explain. I have several albums of music by Franz Schubert on my iPhone (I put composers' names in the Artist field). Some are in the Chamber Music genre, and others in the Keyboard genre. If I tap the Chamber Music genre, I see artists; one of them is Franz Schubert. But I then see all my albums by Franz Schubert listed. This shouldn't happen.

The Music app in iOS 7 took a big step back from the way it worked in iOS 6. I hope Apple pays more attention to this with iOS 8.

Source: Kirkville

Wednesday, April 23, 2014

How to Request a Refund for the App Purchased from Mac App Store

There are a bazillion apps listed on Apple app store. Some are free, some are commercial. Installing and ordering app would never become so easy, by just a simple click, you install the app and get an app on your iPhone or iPad. But sometimes the purchasing for an app is totally a mistake or the app can't work as described. Can you get a refund from the App Store? Yes!

Except for purchasing the app for mistake, there are 5 other reasons for people who may request a refund of the purchased app from App store. Not all people can get a refund, but we have to try that, right? Here's how:

(Remember, this isn't an official refund policy for the App Store because the iTunes Store Terms and Conditions specifically states: All sales and rentals of products are final.)

Step 1: Open up Your Account in iTunes

Locate the email receipt for your iTunes Store purchase.

Step 2: Check Your Purchase History

Once you're logged in, click 'See All>' under Purchase History.

Step 3: Report a Problem

Scroll down until you see the big button that says 'Report a Problem'. Click that big button.

Step 4: Select the App

Find the app you want a refund for and select 'Report a Problem'.

Step 5: Explain

Choose the problem you're having and write a detailed reason why you think you should get a refund for the app.

(Please note: you're fighting an uphill claim so make sure your reasons are legitimate to give yourself the best chance.)

Apple lists these six categories for your app-related complaints:
  1. I didn't receive this application
  2. I inadvertently purchased this application
  3. This application does not function as expected
  4. This application is not compatible with my device
  5. I have another purchase or download-relation question
  6. Good luck. Also, please only refund apps that really don't work. Developers need to eat too.
 
You can expect a response from Apple in the next 24-48 hours. If the support rep is satisfied with your reasoning, he'll probably reverse the charges. Please remember that you are not entitled to a refund under the iTunes Store Sales policy, so if they deny your request for a refund, move on!

6 Possible Reasons for Requesting a Refund from App Store


The iTunes App store sales policy clearly says that you cannot cancel a purchase or receive a refund for a purchase. If you are wondering why people would want refunds for purchases that they have made from the iTunes Apps store, you can consider the following 6 possible reasons:

1. Can't stop the process

eg: You ordered an HD movie from the iTunes store but after making the purchase, you realize that it would take several hours to download that massive file to your computer. You can stop the download but your credit card will still be charged.

2. Incompatible

eg: You have an iPhone but you accidentally bought an iPad version of some app which is obviously of no use to you.

3. Purchasing for mistake

eg: You wanted to buy a game but there were at least a dozen similar titles on the iTunes store. The one you finally bought is not the one you were originally looking for and you therefore want to return it to Apple.

4. Can't work

eg: You purchased a song from iTunes store but there's some problem with the audio format and it won't play on your iPod or iPhone. Or, you purchased a conversion app from Mac app store, but it doesn't work as it described.

5. Misuse iTunes accounts

eg: You have two or more iTunes accounts and you purchased an iPhone App using the wrong iTunes account. You can't transfer apps across accounts so a refund followed by re-purchase makes more sense.

6. Accidental purchases

eg: The 1-Click ordering system, that Apple licensed from Amazon, makes it easy for anyone to buy apps, songs, movies and games from the iTunes store with a single click but this can sometimes lead to accidental purchases especially when kids have access to your devices.

These are just some of the legitimate reasons why people may want to return their iTunes store purchases and request refunds from Apple. In order to avoid the trouble by requesting refund, I suggest you read the detailed app information before making purchases in iTunes Mac app store.

Do you think that they can have a refund successfully, as the iTunes App store sales policy clearly says that you cannot cancel a purchase or receive a refund for a purchase. Don't care much about the result, if you want a refund, you need to find the way to submit your requesting first. In the next article, I will introduce the method to return apps purchased from iTunes store and get full refund.

How to Stream Media Files from PC/Mac to PS3?

PS3 isn't only a game console, but a media player as well for it has a hard drive that allows you to store large media files, such as photos, music, TV shows, videos, movies and even save games on the system. Want to know how to stream or sync media files from PC/Mac to your PS3 easily? This article provides three methods.

When video game consoles first became popular they were for just that - video games. Today consoles are multimedia machines with massive storage space and the ability to grab content from the internet, and if set up correctly from other computers on your home network. The PlayStation 3 can be connected to your home network via the Ethernet port, and while you'll definitely want to do this for online play, you may not fancy the hassle of setting up access to your computer.

If you want to watch a movie or TV show on your PS3 that you've downloaded on to your computer then there are some simple alternative: use a USB flash drive, Windows and Windows Media Player can set your computer up to be a media sharing server. You could also use an external hard drive, as long as it has a USB cable it will work just as well. You may also want to transfer music and photos onto your PS3 or perhaps even a downloaded save game. They can all be transferred in the same way.

Once everything is ready it'll be nice and easy to sync content across. This being said though, if you run into problem it can be infuriating to try and diagnose, which we'll come onto later.


PlayStation 3 Supported Formats

One of the great things about the PS3 is the fact that it supports a wide variety of files. Here's a complete list of supported file formats on the PS3:

Images
  • JPEG
  • TIFF
  • BMP
  • GIF
  • PNG

Music
  • MP3
  • ATRAC (Memory Stick Format)
  • MP4
  • WAV
  • WMA

Video
  • MPEG-1
  • MPEG-2
  • MPEG-4 (H.264)
  • AVI
  • AVCHD
  • WMV
  • DivX Codec
Method 1: Copy videos to PS3 Use a USB Flash Drive

Watching Movies on the PS3 via USB

Here is a simple step by step guide for watching or transferring movie files onto your PS3 using a USB flash drive or an external hard drive.
  1. First of all you'll need a USB flash drive or an external hard drive.
  2. Plug it into your computer and copy over the movie files that you want to watch on your PS3.
  3. Plug the USB drive or external hard drive into one of the USB ports on the PS3.
  4. Navigate to Video on the PS3 XMB menu and find your device.
  5. Hit triangle to view all contents.
  6. Select the file you want and either copy it to the PS3 hard drive or just play it directly from the connected device.
  7. The process for copying music and photo files is exactly the same.

Copying Save Games to your PS3 via USB

The process for downloading a save game and then copying it onto your PS3 using a USB flash drive or external hard drive is slightly different. Here is a step by step guide for copying a save game to your PS3.
  1. Download the save game file onto your computer and unzip it.
  2. Create a folder called PS3 and a folder inside that called SAVEDATA.
  3. Place the downloaded save files in SAVEDATA (they'll often already come inside a SAVEDATA and PS3 folder in which case you obviously don't need to do this).
  4. Copy the PS3 folder onto your USB device (don't place it inside another folder on the flash drive or external hard drive).
  5. Plug your device into one of the PS3 USB ports.
  6. Navigate to Game on the PS3 XMB menu and then select Saved Data Utility and find your USB device.
  7. Hit triangle to explore and select the save game and then choose Copy.
  8. You'll often have to copy individual files one by one.
  9. You should also note that copying some saved games will invalidate your ability to earn Trophies on that game. Just be careful about what kind of files you are copying. For example you can copy Pro Evolution Soccer 2010 Edit Data in order to get up to date names but you can't copy Saved Data or you'll lose the ability to earn trophies.

Troubleshooting USB to PS3

If the PS3 can't see your device it may be due to the formatting. The device you connect must be formatted to FAT32. There are various ways to do this but the simplest is to plug in your device and check what letter the drive is. Then select Run from the menu in Windows and type cmd to bring up the command window. Type the following line in the window format (Drive Letter): /FS:FAT32

Just to be clear if your drive was K then you'd type format K: /FS:FAT32

There is a specific problem I encountered with the SanDisk Cruzer Flash Drive. If you have one of these USB drives you'll need to uninstall the U3 Launchpad software which automatically runs. Before you do this make sure that you back up all data on the USB device because this tool will wipe it completely. You can download the U3 Launchpad Removal Tool here.

Once that's gone you should find it works perfectly and instead of going through the eject process in the software you'll need to do it via the icon in your toolbar which says Safely Remove Hardware.

Hopefully this guide has allowed you to stream media contents to your PS3.

Method 2: Transfer media to PS3 via Windows Media Player

So you don't want to download any extra software? Windows Media Player is all you need. First thing we're going to set is the sharing settings on your computer. If your computer isn't set to share files, no matter how hard you try the PS3 will never see your computer, and if it does it probably won't be able to play what it finds. To get things running, follow the steps below, starting with the Network and Sharing Centre.

In Windows 8: Open your start screen and type 'Network and Sharing'. Click on 'Settings' on the right hand side, and finally click 'Network and Sharing Centre'.

In Windows 7: Click on your start button, and click 'Control Panel'. 'Network and Sharing Centre' should be listed here, if not, click Network and Internet and then you'll see the option.

Along the left hand side of Network and Sharing Centre, there will be a title saying 'Change Advanced Sharing Settings'

For the profile you are using, first make sure Network Discovery is turned ON. Without this, your computer won't show up on networked devices, such as your PS3.

Next, make sure File and printer sharing is ON. Without this, won't be able to access any of the media on another device.


Next, let's turn on the Media Streaming Sever. There will be an option further down for Media streaming, click Choose Media Streaming Options. When you click this, if you get a button saying 'Turn on Media Streaming' click it! This needs to be on for the whole thing to work.


If you have followed up to this point, Congratulations! You can now leave your PC and go to your PS3. Turn on your PS3, and go to either the Audio, Video or Music section, and your PC should be listed there as a media source. Select it, and all available media will be there to use.


Huzzah! You now have a media stream set-up. Results with Windows Media Player have been inconsistent however. Whilst this originally worked fine for me, after a few uses the computer and PS3 wouldn't see each other without of the settings described above changing. This is a major drawback to using Windows Media Player as it seems to be temperamental and doesn't provide much information about why it's not working. There are also limitations and certain file types will never be able to stream using this method. Time for a plan B I hear you cry...

Method 3: Stream media to PS3 via PS3 Media Server

After the inconsistent results I experienced with Windows Media Player, I found my way to a piece of software called 'PS3 Media Server'.

If you're using Windows, just visit their site, click on the Windows logo, and then click pms-setup-windows.exe (there will be a number there too, which is just its version number).

Once the file has been downloaded, open it up and follow the next couple of steps on screen to install the program, open it up and you should see this:


The thing I love about this software most is… That's it! We're all set-up!

Go to your PS3 and you should see the PS3 Media Server Listed in a similar position to the screen shot of the PS3 above.

To access your media, you click on the icon, and the folders you now get on the PS3 are the same as on your computer. So to get to My Documents you will have to go into C:\Users, click on your username, and then My Documents, Music, Videos, and Pictures should be listed here. You can change this if you wanted, so only certain folders are shared in case you didn't want everything on your PC on show, but this is how it is set up as standard.

To make it so only certain folders are shown on the PS3 follow the instructions below:
  1. Click the "Navigation/Share Settings" tab
  2. At the bottom you'll find a "Shared folders" section.
  3. Remove where it says <All Drives> by clicking the Red X
  4. Click the folder with a green plus to add a folder.
  5. Once you've added a folder to this list, it will show on the PS3.

The other really good thing about PS3 Media Server, is that it converts while you watch. This means that files which normally wouldn't play on a PS3 because it's not a file type the PS3 can usually play are changed into files that will play, as you're still watching them! This is done automatically, and it usually doesn't require any additional loading time too so just select the file you want to play.

Notes:
  1. The transferred videos have to be in your "Video" folder.
  2. Your PC and your PS3 might have to be on the same internet connection for this to work well.
  3. Make sure the transferred files are supported by the PS3.

Alternatives

There are other programs out there which will do the same thing, so don't feel like this is the only answer. I personally love PS3 Media Server as it is so easy to set up and use, while other software such as Plex work just as well after being set up. It has to be said, both PS3 Media server & Plex can stream to more than just videos to your PS3 so this guide is really only scratching the surface.

After this simple set up, you will be able to stream content to your PS3 without hassle, just keep your PC turned on, but don't forget the most important step: relax in front of your TV with the popcorn and drinks! Bring on Baseketball.

Knowledge extension:

According Sony PS3 can only play MP4, AVI, AVCHD, WMV video. If you want to move MKV, VOB, Tivo, DAT, XviD, M4V, TS, M2TS, MXF, RM, RMVB, ASF, 3GP, 3G2, F4V, FLV, SWF, MPV, MOD, TOD, QT, MOV, DV, DIF, MJPG, MJPEG, TP, TRP, WebM, etc. video files to PS3, what you should do first is download an app on your PC that will change the format of the videos to match the format that the PS3 accepts. You could easily find something if you Google it. Otherwise, after you have changed the format just insert the memory card, go to the card on the XMB under the videos section and then press triangle and display all, the copy them to your HDD and you should be good to go.

If you haven't install any video convert app on your computer, you can try the Wondershare Video Converter Ultimate. It can help you do the any Video to PS3 conversion task effortlessly. The try before you buy aspect of this product makes it an easy purchase decision. What impressed me the most about my experience is that this video converter provides the built-in output profiles for PS3 and PS Vita as well, making the conversion much easier and efficient. If you are on Mac OS X(including Mountain Lion, Mavericks, Yosemite, El Capitan), Wondershare Video Converter Ultimate for Mac is the alternative to aid you batch convert any videos to PS3 video format on Mac.


You may also like:


Tuesday, April 22, 2014

Borderlands PS3 going offline next month

As a result of GameSpy's closure, PlayStation 3 versions of original Borderlands and Civilization Revolution will no longer be playable online come May 31.


2K Games announced today in a post on its Support site that as a result of the GameSpy Technology closure, it will transition some legacy games to Valve's Steamworks and end support altogether for others.

First, the games that are going offline for good come May 31:
  • Borderlands (PS3)*
  • Civilization Revolution (PS3)*
  • Close Combat First to Fight (PC / Mac)
  • Jetfighter (PC)
  • Jetfighter V: Homeland Protector (PC)
  • Leadfoot (PC)
  • Rune (PC)
  • Stronghold 2 (PC)
  • Stronghold Legends (PC)
  • Top Spin (PS2 / PC)
  • Top Spin 2 (PC / DS)
  • Vietcong (PC)
  • Vietcong Demo (PC)
  • Vietcong Fist Alpha (PC)
  • Vietcong 2 (PC)
  • Vietcong 2 Demo (PC)
  • MLB Fantasy All-Stars (DS)
  • Sid Meier's Civilization Revolution (DS)
  • Major League Baseball 2K9 Fantasy All-Stars (DS)
  • NHL 2K10 (Wii)
  • NBA 2K10 (Wii)

*2K says it is currently looking into the "technical feasibility" of transitioning Borderlands (PS3) and Civilization Revolution (PS3) to another network. But that's all we know right now. Of course, you'll still be able to play all of these games offline.

Also on May 31, the original Borderlands (PC) and various Civilization games will temporarily go offline while 2K completes a server transition from GameSpy Technology to Steamworks. During this time, players will experience interruption of online play, matchmaking, and VOIP. Offline play is unaffected.

Below is a list of 2K games that will be transitioned to Steamworks starting May 31.
  • Borderlands (PC)
  • Civilization III
  • Civilization III: Conquests
  • Civilization III: Play the World
  • Civilization IV
  • Civilization IV: Beyond the Sword
  • Civilization IV: Colonization
  • Civilization IV: Warlords

"We apologize for the inconvenience this may cause," 2K said in a statement.

2K is not the only publisher facing issues from the impending closure of GameSpy. Crytek announced last week that the PC versions of Crysis and Crysis 2 are going offline on May 31. Electronic Arts is also affected, and has pledged to find other means to keep old Battlefield games alive after May 31.

Source: GAMESPOT

You may also like:

Thursday, April 17, 2014

Apple Is Going Green For Earth Day 2014 on April 22nd

Apple is part of this years Green Cities initiative.


For the first time in eight years, Apple is planning to celebrate Earth Day. Cupertino is part of this year's "Green Cities" initiative, which focuses on more environmentally efficient buildings, transportation, and cities, according to9to5Mac.

On April 22, Apple will cover its Apple Store logos with green. Additionally, employees at some stores will be given new Earth Day shirts to wear. At the company's main campus, a "large-scale internal event" is being held in the afternoon.

The last time Apple publicly recognized Earth Day was in 2006 when it announced a computer take-back program the day before the annual event, which was first held in 1970.

Apple's involvement with this year's Earth Day makes a lot of sense, given the focus of "Green Cities." The company has long been committed to making its new Campus 2 environmentally-friendly. In 2013, Apple hired former EPA administrator Lisa Jackson to serve as its top environmental adviser.

Here's a look at the "Green Cities" initiative: