Wednesday, December 10, 2014

How to Remove Netflix Account from a TV, Roku, Apple TV or Blu-ray Player

If you are getting rid of a Blu-ray player, game system or Smart TV that you've previously set up for Netflix and you want to remove your account from the device, it can be a little tricky. Netflix used to allow you to manage devices online in your Netflix account but they've since disabled that feature.

Currently if you want to remove a device from your account online, you have to deactivate *ALL* of the devices and add them back in one at a time. This can be annoying if you have multiple accounts like a Wii or Wii U, Blu-ray player, Apple TV, PS3 and Smart TV all set up for Netflix streaming.

But there is a way to break the link to your Netflix account from the actual device itself. So far, we've confirmed that this works from multiple devices (TVs, Blu-ray players, etc.) and multiple brands (Panasonic, VIZIO, Samsung, LG).

To deactivate the device, get into the Netflix screen on that device, then using your device's remote control, hit the following buttons:

up, up, down, down, left, right, left, right, up, up, up, up.

This should take you to a Netflix system information screen with the option to Disable or Deactivate the player from your Netflix account.  Click the "Deactivate" button to remove the link to your Netflix account.
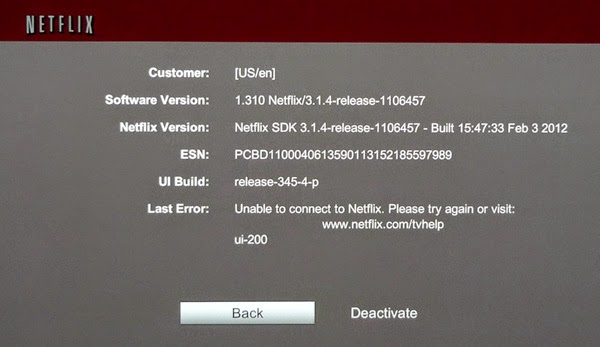


After you hit the proper button sequence, you should see a screen like this.
Go back into Netflix on that device again to confirm that it no longer has access to the account.  You should see a Netflix welcome screen that says "login or set-up your Netflix trial." The actual screen varies from device to device. Once you've deactivated the Netflix account, you can safely sell or give away the device.

Post comments here if it works - or doesn't work - for your particular device.

Wednesday, December 3, 2014

How to Transfer files from Smartphone or Tablet to Your PC?

It couldn't be simpler to get music, photo and movie files from your smartphone or tablet to your PC. There are several ways to do it, the most common of which we have described below:

Via Bluetooth:
  1. Enable your device's Bluetooth. For iPhone/iPad, go to Settings > General > Bluetooth. For Android devices, hit the menu button and go to Settings > Connections > Bluetooth.
  2. Enable your PC's Bluetooth. For Windows 7, click Start > Control Panel > Hardware and Sound > Bluetooth Devices. For Windows 8, press the Windows key + C > Settings > Change PC Settings > Wireless.
  3. On your phone, find the files you'd like to transfer.
  4. Go to the menu and select Send. If it prompts you, choose the via Bluetooth option.
  5. Select your computer in the list of devices that pops up.
  6. You may be asked for a passcode. Follow the instructions your computer gives you to accept the request.

Via Email:
  1. Make sure you are connected to the Internet, preferably via Wi-Fi so as not to incur extra charges.
  2. Attach the files you wish to send to a blank email and send it to yourself.

Via Android USB:
  1. Plug your Android device into your PC via its USB wire.
  2. Navigate to the USB Connected notification on your device's screen.
  3. Select Mount.
  4. On your PC, locate your device in Windows Explorer.
  5. Drag and drop the files you want to transfer from your phone to your computer.

Via Apple USB:
  1. Plug your iPhone/iPad into your PC via its USB wire.
  2. If it doesn't open automatically, launch iTunes.
  3. Click the Devices button in the upper-right corner. Corresponding tabs to the data on your device will appear.
  4. Configure the different content types in each tab.
  5. Click Apply in the lower-right corner of the screen to sync your data.

Via SD Card:
  • Locate the SD card in your device. This is usually in a slot in the side of your phone.
  • Plug it into your PC via the SD card slot.
  • Go to Windows Explorer and navigate to your SD card.
  • Open it and locate the files you would like to transfer to your PC.
  • Copy and paste them to the folder you would like to save them in.