Friday, December 30, 2016

Windows Media Player Won't Play AVI? Solved!

Outline: Sometime Windows Media Player won't play AVI at all or it only plays the audio track? Don't worry about it! Let's have a look at how to play AVI files with Windows Media Player without any problems.

AVI stands for Audio Video Interleave and it is an audio and video container format introduced by Microsoft in 1992. Certain programs, such as DiVX, Xvid and MPEG-4, use codecs to compress AVI files that Windows Media Player does not support. To be able for Windows Media Player to play AVI files, the necessary codecs must be downloaded and installed on the computer.

More Topic: 

One of the common reasons why Windows Media Player cannot play AVI video files is that the player does not support the codec that was used to compress the file. To create video files, programs are used to compress the file to make it smaller and for media players to play the file, it needs to have the necessary decompressing program called a "AVI codec" to be able to read the AVI file. Our guide talks you through this process step-by-step.

Method 1. Steps to Install AVI Codec for Play AVI on Windows Media Player

Step 1. It doesn’t matter which order you install the codecs in, but for the purposes of this guide, let’s start with Xvid. Double click the installer you previously downloaded to kick things off, and follow the onscreen prompts. 

Step 2. Once the installation process is completed, it’s a good idea to reboot your PC. 

Step 3. Next, launch the installer for DivX in much the same way as you did Xvid previously. Follow the onscreen instructions to complete the installation process. 

Step 4. Once installation of DivX has finished, reboot your PC again. 

Step 5. When your PC restarts, Windows Media Player should now be capable of handling almost any AVI file you throw at it (with the exception of AVIs that are encoded with some of the more obscure codecs).

Tips & Advice 
1. Some Codec packs available on the internet come with a built-in player, like DiVX. The DivX Player is a great lightweight alternative to Windows Media Player, and comes available in Free and Pro versions (the Pro flavour costs 14.99€). 

2. GSpot is a useful tool that analyses the video stream of a file to determine the encoding method. Once finished, it generates a report, which includes which codec you will need to download before you can view the AVI file on Windows Media Player. 

Still having trouble playing back certain AVI files on Windows Media Player? Another way to play AVI in Windows Media Player is converting AVI to Windows Media Player support formats: WMV, MP4, AVI, etc.

Method 2. Convert AVI to Windows Media Player compatible formats

Converting AVI to Windows Media Player compatible fprmats like WMV, AVI, MPG, or MP4(Only Windows Media Player support) is an easy and quick approach. The conversion tool, Hivimoore Video Converter Ultimate is worth being the first recommendation. The software supports about 159+ formats and SD/HD/3D/4K AVI is also included. It ensures both the converting speed 30x and 1:1 video quality of the original AVI files. Besides, have you ever been annoyed when you have to deal with the videos to be converted one by one and wait for a long time for processing? With this conversion tool, you can convert your AVI videos in batch mode at once, which saves you a lot of time. 

The URL http://www.hivimoore.com/product/video-converter-ultimate/ is to be visited to make sure that the program's latest version is downloaded, installed and run: 

Play AVI on Windows Media Player Play AVI on Windows Media Player 

Play AVI on Windows Media Player Play AVI on Windows Media Player 

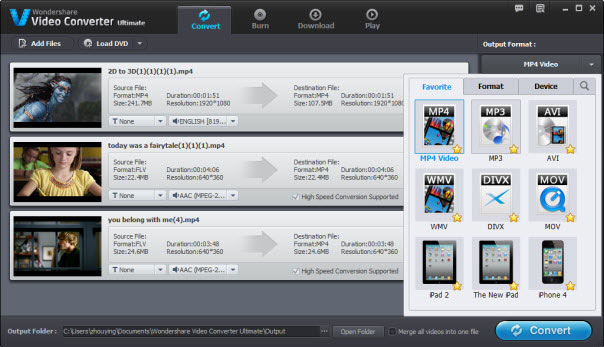
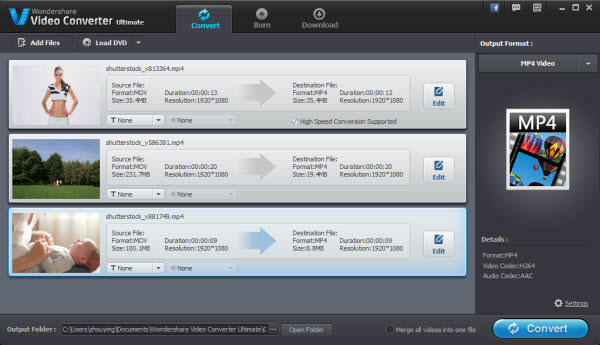
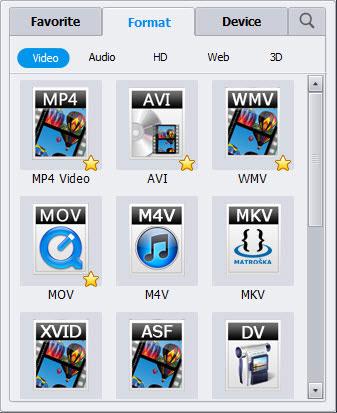
The main interface is as below and you can finish the conversion in just a few mouse clicks: Click "Add Files" to load your AVI movies -> click "Output Format" to choose a proper output video format like "WMV" > Click the "Convert" button to begin the AVI to WMV conversion.

Conclusion: 
The Hivimoore Video Convertor Ultimate is the best and the state of the art program to make sure that the needful is done and the metrics are explained as under: 

1. Easy to use 
Hivimoore Video Convertor Ultimate is the best program that has a user friendly interface and it makes sure that the needful is done with just few clicks and the user never has to get into complex processes to make sure that the needful is done. 

2. Supported formats 
Hivimoore Video Convertor Ultimate supports over 159 formats which shows the professionalism that has been integrated while the program was being developed. It is the best program to make sure that the user gets the best and the state of the art outcome in easy and straightforward manner. 

So, Hivimoore Video Converter Ultimate that integrate video player, HD/4K video converter, video editor, DRM Media Converter, DVD burner, DVD Ripper and online video downloader is highly recommended as the best ultimate solution. 

Editor's Recommendation:

Source: http://www.hivimoore.com/2016/12/avi-to-windows-media-player/

Wednesday, December 28, 2016

Play MKV on Windows Media Player by MKV Codec or conversion

Windows Media Player is a widely-used player that plays various video and audio formats. However, our regret that Windows Media Player won't play MKV movie format. 

In order to make Windows Media Player play MKV movies, you will need to install some MKV codecs for Windows Media Player or try other media players or simply convert MKV to Windows Media Player highly compatible WMV or AVI videos. Keep on reading and choose the way you prefer to make MKV playable in Windows Media Player.

Method 1. Install the MKV codec in Windows Media Player

Install the MKV codec in Windows Media Player by downloading the codec pack and running the installer. Once installed, import the MKV movie to Windows Media Player, and test the playback. You need an Internet-ready computer with Windows 7 or 8 and a browser to complete the process. 

Step 1. Open a Web browser 
Log in to your Windows user account. Open your preferred browser, and wait for the start page to load. 

Step 2. Navigate to the codec website 
Type the MKV Codec website in the browser URL address field. Alternatively, you can navigate to the Shark007 website to download an exclusive MKV codec for Windows 7 and 8. 

Step 3. Download the codec pack 
Click the Download (Mirror) link at the bottom of the MKV Codec website. The download automatically starts upon opening the new page. Click the download link on the Shark007 website if you prefer to use that codec pack. 

Step 4. Install the MKV codec 
Double-click the download to run the installer. Choose custom installation, and uncheck any third-party applications that come bundled with the codec pack. Follow the instructions to install the codec. 

Step 5. Play the MKV video 
Open Windows Media Player. Next, open the folder that contains the MKV file. Drag and drop the file onto Windows Media Player to watch the movie.

Method 2. Try another media player

If you don't like installing codecs for Windows Media Player, or the codec doesn't work for some unknown reasons, you can try to use another media player. You may know of VLC player. Yeah, VLC is a great open-source cross-platform multimedia player. And it can play most multimedia file formats like MKV, AVI, MP4, FLV, WMV, etc, as well as discs.

Method 3. Convert MKV to Windows Media Player friendly WMV or AVI videos

If you don't get used to another media player and just want Windows Media Player as your only media player, you can use a great Hivimoore Video Converter to convert MKV to Windows Media Player compatible video format like WMV or AVI. Don't worry. The conversion process is ultrafast and the output quality is lossless. And the program always run stably. Besides MKV, it converts almost any other audio/video formats (include 3D and 4K videos) to a Windows Media Player supported format on Windows 10. 

Free download the best MKV to Windows Media Player converter and install. Launch the program once the installation is finished. 

Play MKV on Windows Media Player Play MKV on Windows Media Player 

How to Convert MKV to Windows Media Player Format? 

Step 1. Click the "Add File" button to import the MKV movie fils to this converter. Or simply drag and drop the MKV video to the main window of this program. 

Play MKV on Windows Media Player 

Step 2. Select WMV from the drop-down list on the right side of the program's interface. 

Play MKV on Windows Media Player 

Step 3. Simply hit the Convert button to start video conversion. After conversion, you can add the output files to Windows Media Player to play. 

Read more MKV Tips: 
How to play MKV movies on your Android? 
How to Play MKV on PS4? 
How to Play MKV on WD TV Live/Hub/Plus? 
How to Rip DVD to MKV in 1080p or 720? 

Read more Windows Media Player Tips 
How to play DVD on Windows Media Player? 
How to sync iTunes to Windows Media Player? 
Play Windows Media Video .WMV on QuickTime 

Learn more Video Tips: 
How to Play WMV on QuickTime? 
How to Play DVD on QuickTime? 
Play AVI on QuickTime for macOS Sierra/Windows 10 
How to Insert MP4 into PowerPoint? 
How to stream MP4 to Plex? 
How to Play MP4 on PS4 from USB Drive? 
How to Encode MP4 to MPEG-2 for Playing/Editing 
Free Extract and Convert MP4 to MP3? 
How to Play AVI on PS4? 

Source: http://www.starstarsoft.com/play-mkv-on-windows-media-player/

How to force Windows Media Player to open MP4?

Summary: How to make Windows Media Player play MP4 videos? Is there any the fastest and easiest ways to solve the Windows Media Player MP4 incompatible issues? Keep reading.

According to Microsoft support website, the latest Windows Media Player 12 supports MP4 video and audio files. However, MP4 is a container format which may contain multiple video and audio streams. And the video and audio stream can be encoded any of several ways. If the MP4 video or audio codec is not WMP installed codec supported one, Windows Media Player won't play MP4 video of this kind.

Though we can make Windows Media Player play MP4 video by install some codec, like: K-Lite Codec PackMicrosoft MP4 codec, etc., sometime we still encounter can't play MP4 in Windows Media Player issue.

In order to solve "Windows Media Player won't play MP4 files even when the appropriate codec is installed" and to successfully play any MP4 video in Windows Media Player, we had better convert MP4 to Windows Media Player more supported video format like WMV.

Hivimoore Video Converter Ultimate is just the right MP4 to Windows Media Player Converter which can convert all kinds of MP4 video to Windows Media Player supported video format WMV, AVI, ASF, MPG, MP4, etc. Besides converting MP4 to WMP video format, it also can convert MP4 to Windows Media Player supported audio format like WMA, MP3, WAV, AU, and AIFF, etc.

Read more MP4 tips:

  1. How to Insert MP4 into PowerPoint?
  2. How to stream MP4 to Plex?
  3. How to Play MP4 on PS4 from USB Drive?
  4. How to Encode MP4 to MPEG-2 for Playing/Editing?

Read more WMP tips:

Other Key Features

1. Built in 159+ video & audio codecs, this stellar video converter can convert 4K, 1080p HD videos like MKVH.265, M2TS, TS, VOB, AVI, WMV, MP4, AVCHD, HD camcorder videos, etc. and SD videos like AVI, MPEG, MP4, WMV, H.264, MOV, VOB, FLV, WebM, etc. video conversion can also be perfectly supported. Therefore, converting MP4 video to WMV is a piece of cake with it. Besides, it also provides 200+ preset device profiles for video conversion.

2. Also as the best free video downloader for Windows (10), it enables users to free download any full movies/videos/music from YouTube, Dailymotion, Vimeo and other 1000+ video sites in MP3, MP4, AVI, WMV, FLV, 3GP 8K/4K/HD 1080p/720p, etc. at fastest speed.

3. Its video conversion speed is 30x faster than other similar software, because it supports the most advanced Hardware Acceleration Tech, Intel QSV, MMX-SSE, Nvidia CUDA/NVENC, Hyper-threading and AMD 3DNow! What's more, thanks to its High Quality Engine and "Yadif Double Frames" De-interlacing Engine, it can convert MP4 video to WMV with highest HD quality.

4. It is 100% clean and safe, with no adware, malware or virus at all. Smooth, stable and respond quickly.

Free download the powerful MP4 to Windows Media Player Converter, install and run it on your Windows.

Play MP4 on Windows Media Player Play MP4 on Windows Media Player

How to Convert MP4 to Windows Media Player Format?

Step 1. Add Windows Media Player unrecognized MP4 videos

Click the "Add File" button to import the MP4 files to this converter. Or simply drag and drop the MP4 video to the main window of this program.

Play MP4 on Windows Media Player

Step 2. Select WMV from the drop-down list on the right side of the program's interface.

Play MP4 on Windows Media Player

Step 3. Simply hit the "Convert" button to start the MP4 to WMV conversion.

After conversion, you can add the converted MP4 files to Windows Media Player to play.

Play MP4 on Windows Media Player

Editor's Recommendation:

Source: Here Hivimoore offer four ways to Play MP4 on Windows Media Player

Monday, December 26, 2016

2 Ways to Transfer iTunes to USB flash drive


If you have a rich movies collection on iTunes and you might be confused why you can't directly sync iTunes movies to a USB flash drive. 

That's because iTunes movies (.m4v) are copy-protected by Apple's FairPlay DRM, which prevents you from copying any iTunes movies to USB flash drive and other non-Apple devices for playback. Therefore, your USB flash drive will not recognize the DRM-protected iTunes M4V movies properly. Then is there a way to convert the DRM-protection iTunes movies to no-DRM protection formats, like MP4, AVI, MKV, MPG, WMV, Xvid, etc.? The answer is definitely Yes! 

Currently the only way is to remove DRM protection from iTunes movies before transferring them to the USB flash drive. To get your work done, a iTunes DRM Removal is needed. Now we will offer you the best two DRM Removal softwares for transferring iTunes movies to USB flash drive:

Method 1. Hivimoore Video Converter Ultimate (Both Windows and Mac version)

Hivimoore Video Converter Ultimate is an intuitive tool that helps to convert itunes movies and other videos into a format compatible with USB flash drive easily an interactively. Because of its speed and versatility, you get the most use out of this on any device. Plus, you don't have to worry about downloading the wrong version and wasting a lot of money. And it protects you from risky piracy and copy right issues. Hivimoore Video Converter Ultimate is by far the best iTunes M4V converter.


Step 1: After downloading and running the iTunes DRM Video Converter, import the itunes movies of choice to the tool's central work area.

Step 2: Select the destination folder and output format. This is done by clicking the dropdown format menu and choosing the output format as Android OS. In the Output Folder, select the right folder that will hold the converted videos.

Step 3: Begin the conversion and transfer of iTunes files into your Android phone. After changing the settings as desired, click the "Convert" icon. Once conversion is over, find the converted iTunes movie by clicking "Find Target".

Method 2. Hivimoore DRM Media Converter (Windows version)

Hivimoore DRM Media Converter will do the trick for you. It's one of the best iTunes DRM removal tools to help you bypass DRM restriction from iTunes movies to make you transfer DRM-free iTunes movies to USB flash drive freely. While removing the DRM, this magic software can also convert the DRM'd iTunes M4V movies to plain MP4 format with nearly 100% original quality preserved, as well as the original Dolby 5.1 audio track of the iTunes movies.

Learn more at Best DRM Media Converter Review


The full steps can refer ot the guide: http://www.hivimoore.com/2015/03/play-itunes-on-android/

Other iTunes Tips:

Source: http://isharesky.blogspot.com/2016/12/itunes-to-usb-flash-drive.html

Monday, December 12, 2016

Get WMV Movies to Play on QuickTime on macOS Sierra/Windows 10

Summary: Did you fail to import WMV to QuickTime for playback directly? This article will explain the reason and online guide to smooth play WMV on QuickTime.

WMV format isn't recognized by QuickTime?

WMV (Windows Media Video) owns very small size under the same visual quality, that's why it's very good to enjoy WMV videos online. If you have dozens of WMV movie files from the internet and Amazon store, and want to play these WMV videos on QuickTime, what can you do? Plus, WMV videos from Amazon are added with DRM encryption protection. It's really a headache and common situation. 

It's pretty obvious that if you want to play WMV movie on QuickTime, or sync these videos to iOS devices, your need convert WMV to QuickTime playable formats. 

QuickTime only natively supports a few video codecs such as H.264 and MPEG-4, which WMV files aren't encoded with. Of course, you might also use codec components to extend QuickTime to import or play a variety of additional media formats such as WMV. However, you need to pay about $29.00 for WMV playback in QuickTime, but no WMV management with iTunes, and no sync to iPad etc. as well as play DRM-protected WMV movies.

Get The Best WMV to QuickTime Converter for Windows and Mac user

Here, I strongly recommend you another way. Just convert WMV to QuickTime using a powerful yet easy-to-use software: Hivimoore Video Converter Ultimate, support Windows and Mac version, that can convert common and DRM-protected WMV to QuickTime MOV in a few seconds with zero quality loss and 30x speed no matter you are an expert or a newbie. You don't have to be a professional guy who's very familiar with hard-to-understand codec knowledge. With this tool, you can finish the conversion by a few clicks. It's that easy! 

Plus, it not only gives you the ability to handle WMV to QuickTime conversion, but also convert WMV to more popular formats with ease and efficiency so that you can make full use of WMV, such as: create 3D movies for VRencode video to H.265 4k MP4/MKV, and so on. 

What's more, this best WMV to QuickTime MOV Converter owns various functions for you to get your perfect video like trimming the length of the video and adding watermark in the video. It's the best software you've ever seen. Do you prepare to experience this amazing software? Let's see how to convert WMV to QuickTime MOV together. 

For Mac users, just follow this step-by-step tutorial here to accomplish WMV to QuickTime MOV conversion on any Mac running macOS Sierra, El Capitan, Yosemite, etc. 

Free download the program here and install it on your computer. If you're not satisfied with the default storage path, please select the one you like. 

Play WMV movie on QuickTime Play WMV movie on QuickTime 

Play WMV movie on QuickTime Play WMV movie on QuickTime

Steps to Convert WMV to QuickTime mov with highest quality and 30x speed

Step 1. Add WMV file to the program 

Double click the program to open the main interface of the program. Click the "Add File" option to select the WMV file you want, or you can also directly drag and drop the WMV files into the program. Support add multiple WMV files at one time. 

Play WMV movie on QuickTime 

Note: The converter allows you to merge several WMV files into a new file. 

Step 2. Choose MOV as QuickTime output format 

As all know, QuickTime Movies is mainly in MOV format. So here, we can select "MOV" as the output format. Open the format pop-up list and choose MOV in "Video" option. Of course, you can also set video Resolution, Frame Rate, Bit Rate and Code etc. by clicking "Settings". 

Play WMV movie on QuickTime 

Step 3. Convert WMV to QuickTime MOV 

With all efforts done, you can convert WMV to QuickTime MOV by clicking "Convert" button. In a short while, you can import the converted WMV movies to QuickTime for playing.

Extended Knowledge: How to watch WMV files on Mac Directly

Method 1. Convert WMV file to MOV with the Video Converter Ultimate for Mac

Play WMV movie on QuickTime Play WMV movie on QuickTime 

Method 2. Install Flip4Mac Plugin on your Mac computer. This plugin, created by Telestream, allows you to import, export and play Windows Media video and audio files on your Mac. 

Download Mac 

Method 3. Download VLC Media Player. This player handles almost any media format you throw at it. But please note that it's only a playback solution; it doesn't let you edit WMV files in QuickTime supported apps including iMovie and Final Cut Studio. 

Download Mac 

That's all! Now you can play any common or DRM-protected WMV movies with QuickTime on Windows or Mac.

Editor's Recommendation

Source: http://www.hivimoore.com/2016/12/wmv-to-quicktime/

Tuesday, December 6, 2016

Convert AVI to MP4 on macOS Sierra/Windows 10

The Audio Video Interleave or AVI is a container format where the compressed audio and video files are stored in. It's the most common format for audio/video data on the computer. Sometimes you may need to convert AVI to MP4 to get balance of video quality and size.

This is the popular portable MP4 player such as the iPod, iPhone, iPad, Apple TV, PSP, Androi Tablets & Smartphones, VR Headsets, Creative Zen Vision and so on. Now you know MP4 is a lot more powerful, more than AVI is more widely supported, so there will be a lot of cases, people want to convert AVI to MP4 on Windows or Mac computer.

Have you ever wanted a SAFE video converter that converts AVI to MP4 lightening fast, quality intact? Although there are many video converters available, it is difficult to find and you are comfortable using hand tools. However, Hivimoore Video Converter Ultimate is the solution to meet this balance.

This software is compatible with Windows and Mac system, including the newly released Windows 10 and macOS Sierra. With it, you can easily and quickly convert AVI to MP4 without compressing any quality of the original video and 30X speed. Furthermore, this AVI to MP4 video converter allows you to develop the imagination on video editing. For it employs a built-in editor, you can change the visual effects of the video by trimming the play time, cropping the frame size, adding watermark and subtitle, as well as split, merge or rotate AVI videos as you like. You can also extract backgroud music from AVI to MP3, even enbed AVI file metadata information and sync to iTunes library. 


To use the AVI to MP4 converter you need to download it from the website. The software is available for both Windows and Mac users. 

Part 1. Steps to convert AVI to MP4 on Windows (Windows 10 included) 

Run the installer and wait for it to finish. You can still use it even though it's a free version. 


Step 1. Launch this AVI to MP4 video converter on your Windows computer. Click "Add Files" and import the AVI videos you want to convert or directly drag & drop them into the program. Batch AVI conversion is supported. You can add more files at one time. 


Step 2. Click the "Format" icon on the right side and select MP4 as the output format from the format drop-down list. 

Note: This application also supports converting files to various devices, like Apple, Samsung, HTC, BlackBerry, etc. Just Click the "Device" icon to select your desired device. 


Step 3. Once the MP4 file is attached, the next step is to click on "Convert". After clicking on convert, you will be requested to either purchase a full version or continue on free trial. If your intent is to demo and experience first-hand the performance of the AVI to MP4 converter, you can click on continue to trial, or if you are already convinced about its performance, simply click on the "buy now" option. 

Now you can enjoy the converted AVI video file on all MP4-compatible apps. 

Part 2. Steps to convert AVI to MP4 on Mac (macOS Sierra included) 

Run the installer and wait for it to finish. You can still use it even though it's a free version. 


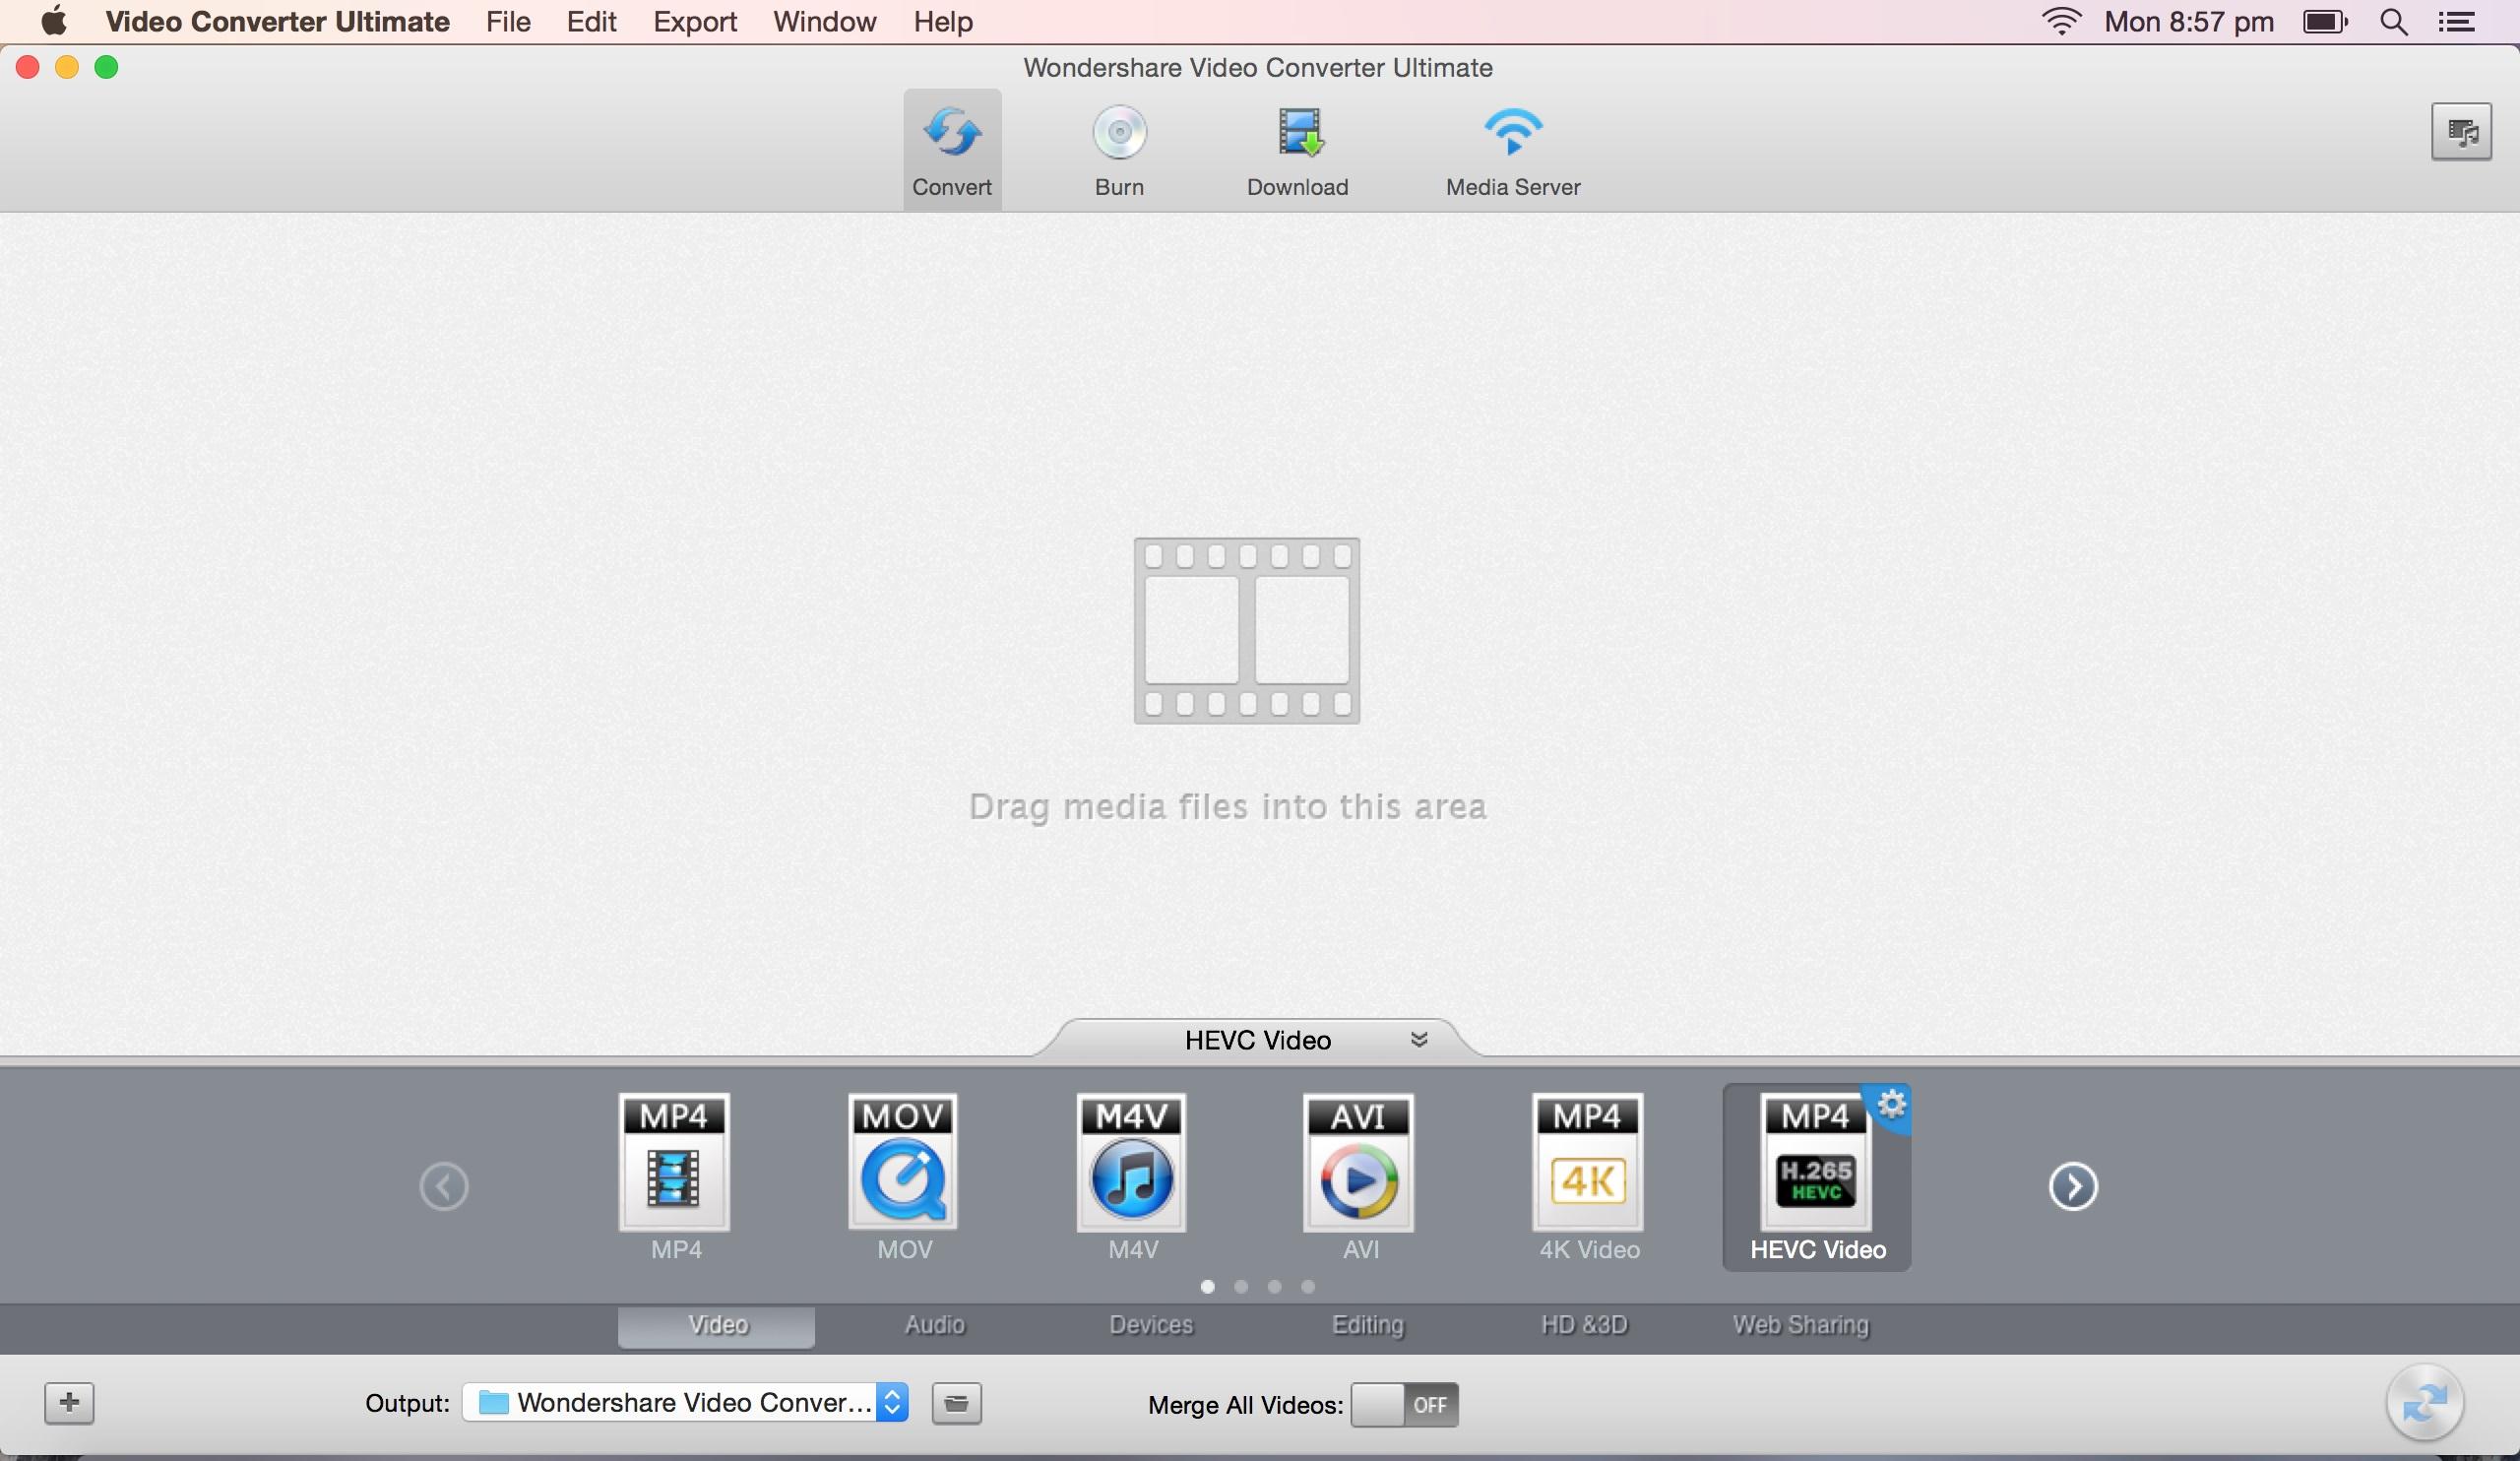
Step 1. Launch the AVI to MP4 Converter for Mac software on your Mac computer. As you can see, there are different commands on the menu bar. Convert, Burn and Download. 


Step 2. Once you have launched the software, the next step is start loading the video files to be converted. Choose "Convert" menu bar, you can load the files by either dragging the desired video file in the interface or just by using the "Add Files" button. 


Step 3. Choosing the output format is the next step. All the output formats are neatly listed out at the bottom, select MP4. A categorized view is available so that the users can easily make their choice. 

If you go to the "Settings", you will have the option to alter the video and audio format. Make sure the audio format is AAC, and the video is H.264. 

Step 4. After you have made all the appropriate setting, the final step is to start the conversion process. Click on the "Convert" button icon to start the conversion process. Once the conversion is complete, you can find the resultant file in the output folder specified. It will not take more than a few minutes for conversion to complete. The conversion time of AVI to MP4 on Mac will depend upon the size of your AVI file. 

Conversion of AVI file format to MP4 is important in order to make the AVI video files compatible with most of the devices and players. 

Editor's Recommendation 
WD TV can't Open MKV files? Why? How to Solve? Hivimoore Tell You! 
Top 5 Best Youtube to MP3 Converters 
How to Play Movies on Galaxy S7/S7 Edge(DVD, iTunes, 4K and HD Video)? 
How to Encode MP4 to MPEG-2 for Playing in TV stations, TV receivers, DVD players, Non-linear editing software? 
Can PS4 play MKV, AVI, VOB, M4V, M2TS, H.265, WMV, FLV, Tivo videos? 
How to Play MP4 video on PS4 from USB Drive? 
Multiple Ways to Add lossless FLAC files to iTunes and iPhone/iPod/iPad 
How to Encode MXF to MOV for playing or editing? 
Edit MXF in Premiere Pro CC 
Free Edit Canon XF MXF in FCP X 
How to Free Download Music from YouTube to MP3? 
2017 Best 4K Video Converter and 4K Video Downloader Review 
Best iTunes Video Converter for Windows 10/macOS Sierra 

Source: http://www.starstarsoft.com/convert-avi-to-mp4

Transcode MXF to QuickTime MOV Quickly and Easily

Want to transcode MXF to QuickTime .MOV for using in Video player or Non-linear editing system? If this is the case, this article is the right choice. It introduces a simple and reliable method, so you can easily finish this work at a very high video quality and speed.

MXF is a "container" or "wrapper" format, primarily used in digital cameras like Canon XF100/XF105/XF200/XF205/XF300/XF305, Panasonic HVX200/HPX300/HPX500 P2 MXF, Sony XDCAM, etc. to store audio, video and programmed data. Why user need change MXF video files into QuickTime MOV? The main reason is that MXF file format is not compatible with many programs, including QuickTime, FCP, etc. So you may have problem to play, edit or use MXF format. (See QuickTime support file formats

Apple QuickTime movie is stored in the format of Apple QuickTime (.mov, .qt) which is a file format for storing and playing back movies with sound. Though developed and supported primarily by Apple Computer, the format of Apple QuickTime isn't limited to Macintosh operating systems. Apple QuickTime is also commonly used in Windows systems, and other types of computing platforms. In Windows, QuickTime movies usually appear with the .mov filename extension. 

Here, Hivimoore recommend smart MXF to QuickTime MOV converter for you - Wondershare Video Converter Ultimate. With it, you can quickly get your QuickTime MOV file from your MXF files(including 3D MXF, 4K MXF) for a variety of MOV-compatible applications with best quality, fastest converting speed, excellent A/V sync and so on. 

Plus, the best MXF to QuciTime mov converter includes a built-in video editor, you can use to cut off anything you don't want, crop the video screen to any region or focus on any screen area what you want, merge a few MXF clips into one, and adding all kinds of cool effects and so on. 

And The MXF Video Converter Ultimate also can convert all MXF file to HD MOV, HD MP4, HD AVI, HD TS, HD WMV, HD MKV, HD MPG, H.265 MP4/MKV3D MP4/MOV/MKV/AVI, etc. for playing, editing, sharing, burning, etc. so that we can use our favorite MXF video files everywhere. 

Now, follow the step to use this great MXF to MOV video converter to edit and convert MXF to QuickTime MOV format on Windows and Mac. 

Support the latest Windows 10 
  

Support the latest macOS Sierra and El Capitan 
  

----Read morePlay DVD on QuickTime | Edit MXF in Premiere Pro CC | Free Edit MXF in FCP X | Edit DVD in FCP 7 

Steps on Transcoding MXF to QuickTime mov on Windows 10 as example

Step 1. Add MXF videos to the MXF to QuickTime MOV converter 

First, export your MXF files from your camcorder to PC. Then, either click "Add Files" icon to load the MXF videos you want or directly drag your MXF videos to the program window. Now, you can see they'll appear in the left item tray as thumbnails. 

Note: If you want to join multiple MXF clips into a big file, at this time, you can directly finish this job in this app. re-arrange the imported videos according to the play order, and then check the box "Merge all videos into one file" option at the bottom. 


Step 2. Choose QuickTime MOV as the output format 

On the right side of the program window, there is an "Output Format" pane, where you need to click the format icon to open its output format window. An then in the pop-up output format window, select "Format" category >"Video" subcategory and then select "MOV" as the output format. 


Optional - You can also hit "Settings" option at the bottom of the "Output Format" pane to open setting window. Here, all parameters for audio and video can be re-set, including encoder, frame rate, resolution, bitrates, etc. 

Step 3. Customize your video files (Optional

This MXF to QuickTime MOV Video Converter also provides video editing functions. Simply click the "Edit" in the menu bar to enter into its editing window. 
Trim feature can let you trim any clip you want. 
Crop feature helps you to remove black bars or fucous on the screen area you want. 
Effect feature helps you to add some cool effects to enhance your videos. Also, you can adjust brightness, contrast, and saturation, add watermark or subtile files. 


Step 4. Start the MXF to QuickTime MOV conversion 

Click the "Convert" button to perform MXF to MOV conversion on your Windows or Mac. A while later, this app will finish the job for you. Of course, you can simultaneously do other jobs without being disturbed by letting it run in the background. 

After conversion, you can make full use of these converted MXF video files now. Can't find the output files? Just click the "Open Folder" button at the bottom of the program window. 

With this MXF to QuickTime MOV Converter, you can freely enjoy your interesting MXF videos shot by your MXF camcorder. 

Editor's Recommendation 

Source: http://www.starstarsoft.com/encode-mxf-to-mov/